 Guides


Page 1 of 1: How to Make and Burn ISO Images with PgcEdit
Software required:· PgcEdit version 7.0 or higher – Get it here
· ImgBurn version 1.1.0 or higher – Get it here
STEP 1 – LOAD THE PROJECT INTO PGCEDIT
Open PgcEdit and open the ripped project (File >> Open DVD menu) by browsing to the folder containing your DVD files.
STEP 2 – TURN 32K GAPS ON
Make sure the option “When saving, leave at least 32K of space between IFO and BUP†is ticked (Options >> Input/Output menu). This is a one time setup only. For a technical discussion about this, see below.
STEP 3 – SET UP YOUR BURN SETTINGS
Setting up the burn the first time (this dialogue is also accessible from Options >> Input/Output >> Burn /Create ISO Setup):
i) Click the burn icon or from the menu select File >> Burn DVD /Create ISO
(ii) The first time you burn from PgcEdit, the following setup screen will appear.
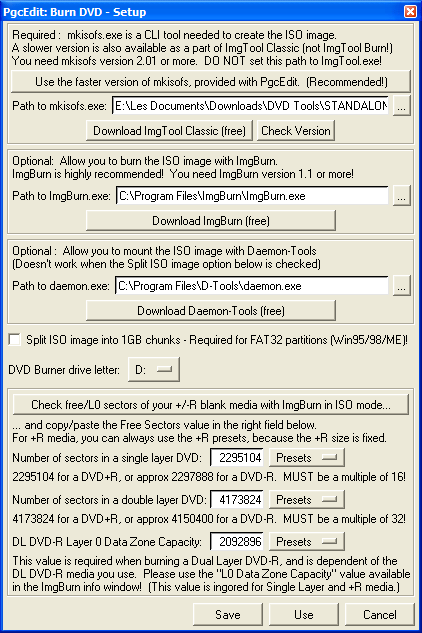
(iii) If you are using Microsoft Windows, click on “Use the faster version of mkisofs, provided with PgcEditâ€. If you use Linux as an operating system, mkisofs will already be on your system and if you are on MacOSX, it is distributed with the PgcEdit Starter application.
(iv) Download ImgBurn by pressing the button. Install it. Let PgcEdit know where the ImgBurn.exe file is located on your hard drive after installation.
(v) (Optional) Download and install Daemon Tools – this is a program that “mounts†ISO images as virtual CD-DVD drives, so you can see what’s inside the ISO.
(vi) If you are on Windows 95/98/Me only, tick the “Split ISO image into 1 Gb chunks†– otherwise leave it unticked.
(vii) Set your burner drive letter.
(viii) Find out the sizes of the media you have and enter them in the appropriate boxes. Do this by popping a blank DVD into your drive, opening ImgBurn, pressing W and noting the number of free sectors and, for dual layer disks, both the number of free sectors and (if you use –R dual layer disks) the L0 Data Zone Capacity.

The presets will usually be OK for +R media.
(ix) Save your settings.
STEP 4 – MAIN BURN SCREEN
Once you have completed the burn setup, you can burn by clicking the burn icon on the main toolbar, or through the PgcEdit menu (File >> Burn DVD / Create ISO).
The main burn screen appears. Note: You can change your burn / ISO creation settings by clicking on Setup at the top.
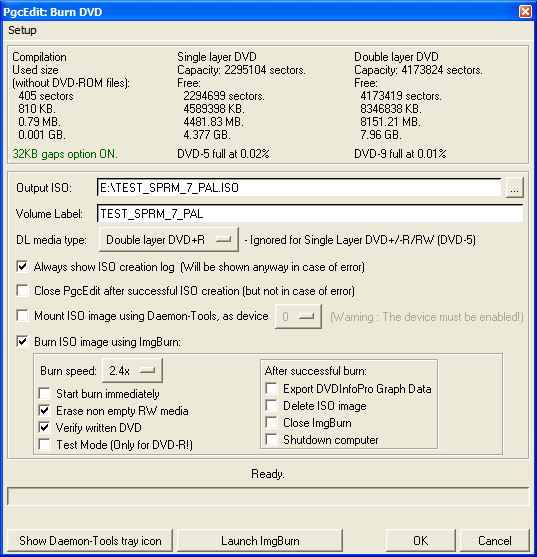
If your files are not already in a VIDEO_TS folder, PgcEdit will offer to put them there and create the file structure automatically for you. Click yes, if you see this warning.
Notice also the handy information dialogue at the top of the screen.
Tick the appropriate boxes (I always use “Verify†unless I’m doing a test with an RW). Ensure “Burn ISO image using ImgBurn†is ticked.
Give the output ISO file a name – anything will do so long as it ends in .ISO and pick a convenient location to save it. The easy way is just to click on the 3 dots to the right and you can generate the ISO where you like (I tend to use the desktop as you can easily find the ISO and delete it when you are sure you no longer need it).
Tip: If you have 2 hard drives, saving the ISO (which is temporary and will be deleted pretty soon) on the other IDE channel will very much speed up its creation.
Now, fill in the volume name (this is the name of the movie – e.g. GANGS_OF_NEW_YORK). Don’t forget those underlines and make sure they are all UPPER CASE. (If you have filled in the name of the disk using the PgcEdit menu DVD >> Text General Name, this will be displayed automatically. Very handy)
Select a burn speed from the drop down box – I recommend 4X for single layer disks and 2.4X for dual layer disks.
Press OK.
STEP 5 – ISO CREATION
The ISO creation starts (it will take about 4 minutes for a single layer DVD, up to twice as long for a dual layer). Once finished, PgcEdit will display the following screen:
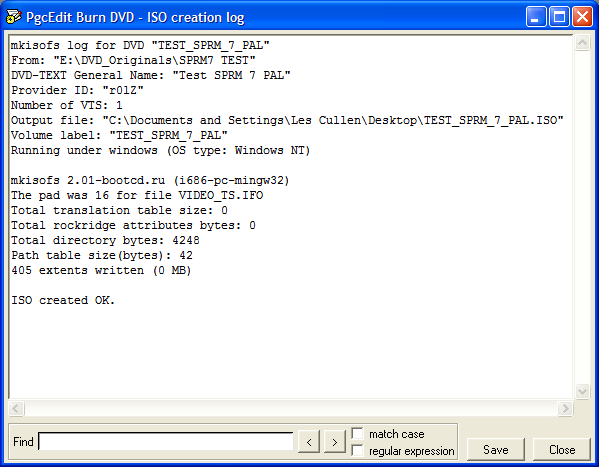
Notice the “pad†was 16 for VIDEO_TS.IFO. This is because you have the 32k option ticked. PgcEdit has figured out that there either was no VIDEO_TS.VOB or it was a 0 byte file and has spaced your files in the ISO properly.
The message that the ISO was created OK means you’re good to go and PgcEdit will launch ImgBurn to burn (and verify if you have selected that option – always a good idea, IMHO). If there was an error creating the ISO, the process will stop and you will NOT make a coaster.
STEP 6 - BURNING
ImgBurn will now open fully loaded with the ISO created in PgcEdit. Insert a blank and press the green “start†button and go make coffee.
DUAL LAYER DVDS
More detailed information is contained here (although the process is exactly the same).
TECHNICAL INFORMATION REGARDING 32K GAPS
There can be gaps on a DVD. The most notable ones are those used to ensure that no ECC block contains any portion of an IFO file and its associated BUP file. Oftentimes, you will see commercial DVDs authored with tiny menu files of 40 or 50 kb, exactly for this purpose. Since ECC blocks are 16 sectors long (32K), the easiest way to accomplish this is to ensure that there are 16 sectors between the end of the IFO and the start of the BUP. With VIDEO_TS.VOB or VTS_xx_0.VOB files less that 32K (or absent) this means using a gap.
Burning programs handle this in one of three ways, two of which are correct.
· They can honour the authoring program's layout and place the data on the disk according to the pointers in the IFO files. · They can make their own layout decisions and alter the pointers accordingly. · They (notably Nero, at least in several past versions) pack the data as closely as possible and ignore the pointers.
The upshot of this is, to use ISO images and burn with ImgBurn to maximize the chance of a "good burn".
Why is this needed?
If an IFO is unreadable (e.g. a CRC error in a sector), the player looks for the BUP, which is stored on the disk right after the VOBs for the titleset. Now suppose the VOBs for that titleset are small and the data is packed in. There is a chance that the BUP occupies exactly the same bad block that the IFO did, making the BUP useless and the disk, dead in the water.
Essentially, the basic problem is that without the proper spacing, a single CRC error that would normally only affect one of the two files will affect both, rendering both useless. If proper spacing exists, it would take at least two CRC errors (one affecting each) to render both the IFO and BUP useless.
It’s important that one failed sector does not ruin both the IFO and the BUP, making the DVD into yet another coaster.
This problem does not affect disks which have VOBs for each and every VTS totalling 32K or more. However, crucially, it does affect ALL disks “reauthored†by DVD Shrink and Nero Recode (and possibly other one-click backup programs).
The solution is to turn on the 32k gaps option in PgcEdit.
Questions should be directed to the doom9 forum here.
Happy and safer burning with PgcEdit!
