 Guides

Page 1 of 1: How to convert PAL DVD’s to NTSC and vice versa
HOW TO CONVERT PAL DVD’s to NTSC and VICE VERSA
(Edited Version)
Most countries in the world use the PAL video standard which has a frame rate of 25 frames per second (fps). The US, Canada and Japan use NTSC which has a rate of 29.97 fps. Most DVD’s are encoded from videotape with a rate of 24 fps and are interlaced. The MPEG streams on the DVD contain instructions regarding how to treat the video information for display depending upon the type of DVD player. For example, to play a stream in PAL format, each frame of the video is shown twice, video and audio data is interlaced and both audio and video are “speeded up†by 4%. The audio then becomes slightly sharp from its original recording, The data can be displayed non interlaced (progressive scan) for component (RGB) video and on computer monitors.
Many DVD players are supposed to be able to play both types of video formats. You could test this with a DVD that has been copied with removal of region codes. Perhaps the manual from your DVD player contains instructions as to how to view both systems from the menu control. If your player gives a message “not NTSC†or “not PAL†if probably won’t work. With the message “wrong region code†when an NTSC or PAL disc is inserted, try a copied disc as mentioned above.
There are no doubt PAL DVD’s in countries favoring NTSC and vice versa. Those who visit other countries and purchase DVD’s there may be surprised when the title cannot be watched when returning home. You can purchase “Region FREE†DVD players from a variety of sources. These have the region checking disabled and chipsets that will display all types of media. I purchased one of these and it did work but with significant vertical columnar artifacts which could not be removed. These devices can be very expensive and where is the warranty for a hacked device? They are not necessary for viewing DVD’s on a computer when region codes are disabled. Newer elaborate copy protections do not affect playback on a computer, either, since you are not copying to the hard drive, just decoding the VOB’s with software. With four DVD players in the house, it seemed to me to be much simpler to convert the purchased DVD’s with PAL format to NTSC and watch the copies.
For this guide you may need some of the following software:
1. IFOEDIT
2. Nero Vision
- COPY THE DVD TO THE HARD-DRIVE
The steps below assume your DVD has been copied to your hard-drive and is unencrypted/unprotected.
Create a new folder in Windows Explorer (File>New>Folder) in which to place the contents of the
VIDEO_TS folder.
2.NTSC to PAL CONVERSION
Your DVD consists of one or two main titles (movies) and several smaller title sets. Insert a DVD and
in Windows Explorer, right click on your DVD drive and you will see folder called VIDEO_TS. Open it
and you will see a list of files like this:
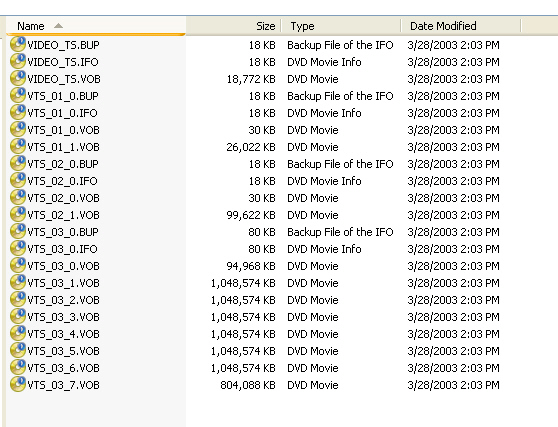
Figure 1
The movie is the title set VTS_03_1.VOB through VTS_03_7.VOB . VTS_03_0.VOB is the menu for that
title set and VTS_03_0.IFO is the information file that controls playback when it is read by a program. Each VOB is roughly
30 minutes long for a one Gigabyte file on the DVD.
The simplest way to convert from NTSC to PAL is called the patch method and uses IFOEDIT which is free.
It is the reader’s responsibility to transfer the DVD to the hard drive in a folder that has been created by the reader of this article.
Now open IFOEDIT and navigate to the VIDEO_TS.IFO file in the folder that you have created. Double click on this file.
In the lower pane of IFOEDIT you will see the letters NTSC several times( Figure 2):

Figure 2.
Each time that you see NTSC, double click on its line to edit that line. You will see the following:
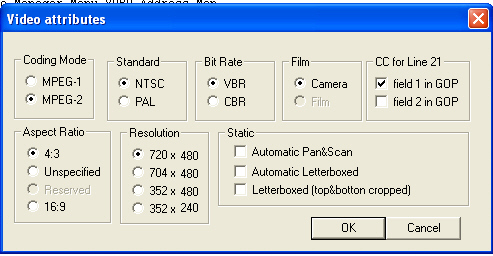
Figure 3
Change the standard to PAL and the resolution to 704 x 480. You should choose an aspect ratio that follows what is present
on the NTSC DVD—usually 4:3 or 16:9 which is letterbox. You can read this directly from IFOEDIT’s panel. on the same line
as NTSC. If you do not specify a ratio, the DVD will be unplayable.
Check Automatic Letterboxed for Static. For a 4:3 movie, you can leave the STATIC box unchecked. Everything else can be left
alone. Now click SAVE. SCROLL DOWN in the lower pane to the next line containing NTSC and do the same . Change every
line in this manner and SAVE. Your changes are not reflected until you close and restart IFOEDIT.
Open the VTS_01_0.IFO file. Find every reference to NTSC in the lower pane of IFOEDIT, make the appropriate changes
(edit this line) and SAVE. Open every IFO file on the ripped DVD, make these changes and SAVE. Close IFOEDIT and restart it,
opening each IFO files and looking in the lower pane to confirm that only PAL Video files are present. Now you can play the movie
in this folder in IFOEDIT or any DVD player to confirm that all works well. To open a DVD folder based upon the VIDEO_TS.IFO
file, right click on this “master file†in Windows Explorer and choose “Open With.†After 30 seconds you will see a list of programs.
Most likely IFOEdit.exe is not one of them. Select “Choose Program†and you will see a list of programs. If IFOEdit is not there,
choose “Other or Browse†and navigate to the location of IFOEdit.. You can do the same for any other player
(Example: Program Files>Intervideo>DVD7>WinDVD.exe) .The next time you right click an IFO file, the player will be available.
If playback is jerky or distorted, then verify that all of the NTSC video parameters have been modified as described above.
This exercise instructs your software player or set top DVD player to modify its treatment of the 24 fps files on the DVD to the
PAL standard. Now you can burn the new folder that you have created onto a blank DVD. In the case of this example DVD,
shrinking will be necessary due to the large overall DVD size in Figure 1.There are various ways and numerous programs which
will accomplish this. The commercial program Intervideo DVDCopy will do this by opening the location of the video files.
You should have lots of free space on your hard drives(s) to accommodate the temporary files created by the programs folders.
3. PAL to NTSC CONVERSION
Preparing for the Conversion process:
The Windows Explorer listing shown below in Figure 4 is for a DVD with two identical titles—one with a 16:9 ratio and the other standard 4:3.
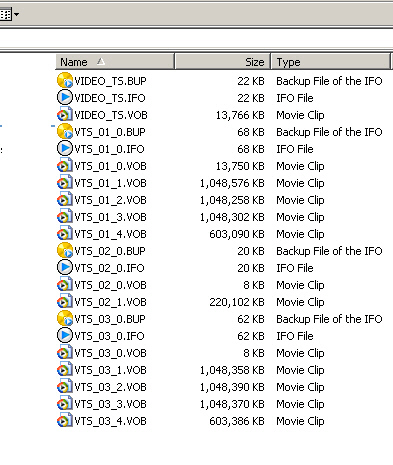
Figure 4
When you open the DVD on your hard drive in IFOEdit (open VIDEO_TS.IFO) look to the lower pane and you
will see the language information. As an alternative, you can just watch the move and look for more than one language
in your viewing software such as WinDVD.
If more than one language is present you need to remove all but the one that you want to keep. This is
because Nero may get confused and encode the undesired language into the solitary AC-3 file it creates.
Also look in IFO for a DTS audio track although these are infrequent.
If there is one, you need to eliminate DTS.
Create another new folder on your hard drive. In IFOEdit open the VIDEO_TS folder of the DVD on your
hard drive and look for the IFO file for the main movie (see above to locate the main movie). Click the VOB
Extras button. Your Destination directory should be the new folder that you have created.
Use the settings below in Figure 5a and hit OK. In the next step is that you will have the option to remove
languages and DTS audio by unchecking the boxes in the dialogue box (not shown). Hit OK and IFOEDit will
take fifteen to twenty minutes to create a new DVD and DVD structure (movie only) and new IFO files
In reality, only one language and no DTS is present in the great majority of cases.
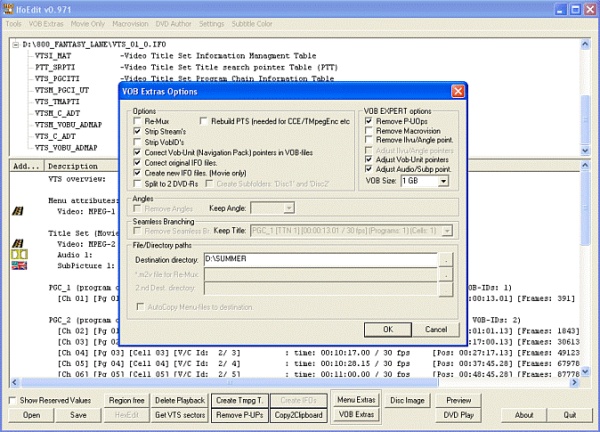
Figure 5a
Use the new folder you have created (if it was necessary to create it) for the next step.
USING NERO VISION
Nero Vision 4.7 is part of the Nero Suite Version 7.2 and following. If you have a serial number for Nero 7.0, you can
download the current version which contains the new version of Nero Vision and update for free. The file size is substantial.
Nero Vision has the ability import video files of all sorts and convert them to NTSC or PAL DVD format including directly
VOB’s from a DVD drive if AnyDVD is installed. Importation of videos from the hard disc is always possible. They can be
VOB’s, mpegs, or even AVI files.

Figure 6
From the Start Menu> All Programs> Nero 7 Ultra Edition>Photo and Video> Nero Vision
At the bottom of the next page, you will see a button that says “More.â€
Click it to configure Nero Vision. The only thing that you should need to verify is that fact that there is plenty of space
(folders tab) to accommodate the temporary files on your hard drive or external hard drive. . Nero Vision places Imported
Videos (mpeg’s) in My Documents\NeroVision\Imported Video Files. These files can be quite large so you may want to
put them elsewhere in your system. Close this dialogue box. Click on Video Options and choose NTSC for the expected
video mode. All other options can remain the same. Close the dialog box.
From Make a DVD>DVD-Video Click here.
On the next screen, click on the More button at the bottom of the screen. You will see the option of choosing
“Create Chapters Automatically.â€
If you click this and close before importing video, it will apply chapters every two minutes in a regular movie and you
will not need to use the Create Chapters page. Chapters are, however, optional and the program does create PGC info
so that you can fast forward and rewind. Choose video options from the MORE button and choose the tab for DVD
Video. If you choose AC-3 audio, either two or 5.1, you have the best chance that the resultant DVD will be playable
on most stand alone players. Now you can either import a from your folder on the hard disk.
Click on the first VOB file for the main movie. For example, VTS_01_1.VOB if Title 1 is the main movie,
hold down the Control key and add the other VOB’s in order. Click open and then “Yes.†to integrate the VOB’s as one title.
After about 10 minutes the movie will be shown at the top of the filmstrip. You can add other titles (previews, trailers, interviews)
but the resultant DVD may require shrinking, which Nero can certainly do. This just prolongs processing time.
Double layer disc burning without shrinking is also an option.
After you are done adding files, you can choose to have Nero create chapters according to its method as outlined on
Nero’s Chapters page To get there, just click “Create Chapters†after you have added your videos.
You can also choose to create the chapters yourself, which can be a little tricky. The Chapters generated from the
chapters page will appear on separate menus but the every-two-minute chapters (see preceding paragraph) do not appear
as menu items.
Next, the menu:
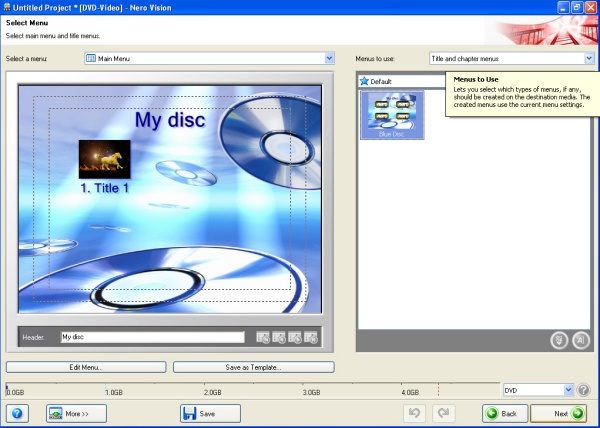
Figure 7
The menu screen has a number of options. At the top on the right of the menu screen, there is a drop down box where you can disable the menu to save time and
DVD disc space. If you choose a menu, each of your titles will have its own clickable icon. After previewing the DVD, you can burn to a hard disk folder or
directly to DVD. Nero will ask you if you really wanted to burn a PAL DVD since most of the content is PAL. The answer must be NO. I have found that
the first DVDs should be burned to a completely new hard disk folder to verify that everything is going as expected. Create a new disk folder each time since Nero may
not erase the contents of a previous folder as expected. You can burn from the hard disk folder with various programs or from Nero Burning ROM or Express.
If you choose to burn from Nero Visionand it suggests that the resultant DVD might not be playable, go ahead and hit proceed. The process should take about two
hours on a fast machine. NTSC DVD’s can also be converted to PAL by choosing PAL from the Video Options at the beginning. The aspect ratios are handled
automatically. When burning to a Hard Disk Folder or DVDR, allow the DVD to be PAL mode although Nero will suggest that it should be NTSC.
One word of caution, Nero Vision will create MPEG files of your imported VOB’s in a folder in My Documents>NeroVision>Imported Video. These files
are as large as the DVD so your need to erase once you have successfully burned your DVD or you will have disk space issues eventually. The same goes for
your new folders on the hard drive.
The other program that can be used is INTERVIDEO DVD Creator 3.
One benefit of using it to convert From NTSC to PAL or vice versa is that the DTS audio is not a problem. If more than one audio language is present,
it is still probably a good idea to rip the DVD and remove the unneeded language. The slight disadvantage in using this program is that there is no
fine adjustment for shrinking the video. You must choose HQ or GQ or SP, etc. which results in changes in the file size before burning a DVD.
If the file size is too large, the excess is displayed in red (before burning) and DVD Creator will refuse to continue. Like Nero Vision, this program
will accept video from a number of sources but transcodes them very slowly—it can take many hours to convert a video. There is no reduction in
file size when converting between formats as in some programs and the results are excellent.
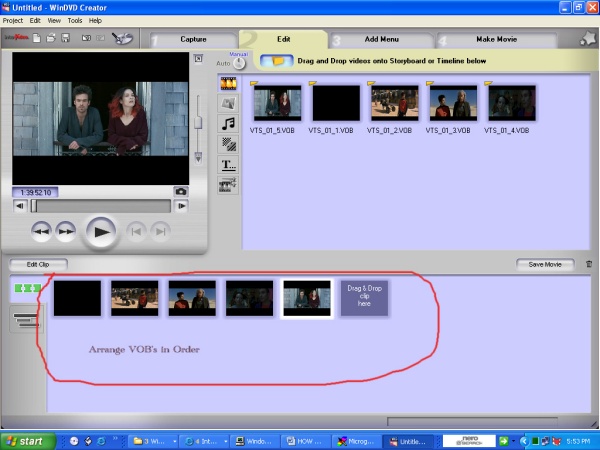
Figure 8
When you first start the program, it will ask certain questions about the desired resultant video system (NTSC or PAL) and whether you are burning for a DVD
or recorder (DVD). Use Dolby Digital sound .for the output format . The default quality may be HQ but that is a very high data rate—more than the typical
4000 Kbits/sec normally used in DVDs. SP is a better choice.. Then import your movie. A VOB is not a default file type (Files of type) when importing.
Choose ALL file types at the drop-down box at File>Open. Then you will see your VOB files. You can import them in any order but there is no reason
to import the menus. (VTS_0X_0.VOB). You will have to arrange your VOBs in the correct order on the timeline in the Edit mode (Figure 8). It takes a
few seconds for each VOB to appear in the program. Then make a menu and add chapters if desired. The chapter addition every X seconds is simple and fast.
When you burn, you will see that the program has added enough data from the menu (if chosen) to increase the overall file size. You may need to reduce video
quality using the drop down box . The DVD may end up being twenty percent smaller than the original even if it was a normal 4.7 Gig movie to begin with.
However this is due to the lack of fine tuning during the “shrinking †process. You can see how this works below:
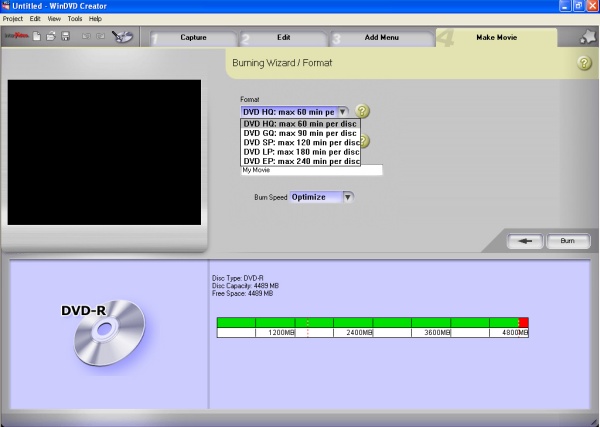
Figure 9
Fortunately, however, Intervideo DVD Creator 3 will burn a Double-Layer disc. With a DVD of capacity less than about 5 Gig,, no reduction in quality
would take place in DVD HQ mode and a DL blank DVD. If you want to fill the DL disk, a slight step down is quality may be necessary if your original
DVD is about 8 Gigs total.. This is due to the size of the menu and changes in file sizes between video modes. DL blanks do not currently play as consistently
in stand alone players as
DVD5 + or - R copied discs.
The quality of conversion is very high but the overall time required by this program is very great.—at least five to six hours with a fast machine With dual-layer
burning, less shrinking is necessary
4. SUBTITLES
Subtitles are a subject all to themselves. Nevertheless, there was one PAL DVD whose subtitles seemed important to retain. Although other methods of doing this
are found on the Net, I found the commercial program DVD-Lab PRO to be very helpful. Here are the steps: Use SubRip to extract the subtitles from the DVD
and Save an SRT file. Using Unicode characters instead of standard ASCII caused the SRT file to be unreadable by DVD-Lab PRO. Load the SRT file into the
subtitle track of DVD-Lab PRO as an import and create an SP1 file accordingly. Use a program like Intervideo DVD Copy or others to shrink the video
(movie only) down to about 4.1 Gig. This is because DVD-Lab PRO will not shrink videos. Use Nero Vision to import the shrunken PAL video and then
EXPORT it as NTSC file. The exported video is an MPEG which can be loaded as an asset to DVD-Lab PRO, which will separate the file into m2v and
AC3 files.. Add the resultant files into the same track as the subtitle. Compile the DVD then burn it..
5. OTHER AUDIO TRACKS
Programs like VOBEdit and PGCDemux will separate out the various audio tracks from a DVD. We discussed the method for converting a (shrunken)
PAL DVD to an NTSC MPG file above. The MPEG file can stripped into m2v (video) files and audio files of various types with freeware like
MPEG_STREAMCLIP. The audio files would be discarded since more than one audio track has been demuxed in VOBEDIT and can be added
in DVD-Lab PRO. The m2v file for the entire movie can becombined with up to two AC3 files in DVD-Lab PRO. The video audio sync has not been a problem.
I did use many other freeware, shareware and commercial programs to try perform the conversions but none were as effective and
reliable as the programs above. Ulead DVD Movie Factory 5 or Video Studio 10 will shrink and transcode (i.e. change from one video format to another)
files but it reduced the size of the resultant DVD when converting from PAL to NTSC but not vice versa!. Other Shareware or “Net sale only†software either
crashed during conversion, lost audio, reduced file sizes unpredictably, or were unreliable from DVD to DVD. Reliable conversion between the two video modes
can be accomplished with the two commercial programs mentioned above. Both can be downloaded from the Net.
The best reference for learning about DVD structure is DVD Demystified 3rd edition, by Jim Taylor, Mark Johnson and Charles G. Crawford.
