 Guides
Page 3 of 6: Using VirtualDub - Re-encode AVI for standalone compatibility
After clicking "Compression...", you will now have to choose which codec you want to use. Either XviD or DivX. First I will show you the DivX method below, then on the next page I'll show you XviD method. You can skip to the XviD method here.
Using the DivX codec:
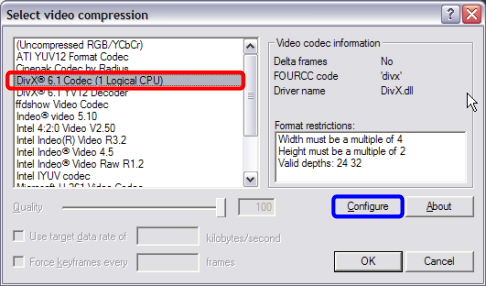
On this screen, select the DivX codec (red) , then click the "Configure" button (blue). (Screen Shot Below)
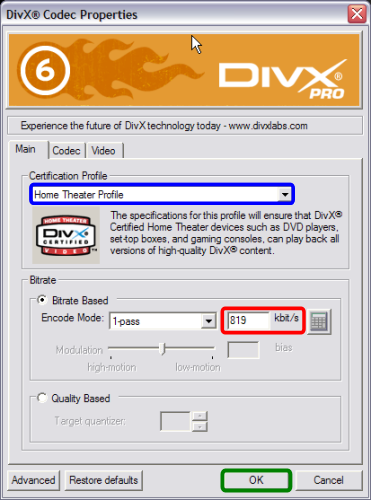
After clicking the "Configure" button, this screen will come up. As mentione earlier, you can enter in the original bitrate you wrote down in the first step in the "Bitrate box", mine was "819kb/s", so thats what I put there (red).
Or if you want something more precise, you can use the built in bitrate calculator by pressing the button with the picture of a calculator on it. Here, you'll need to enter some of the other information we took down from GSpot, such as the duration, the audio bitrate, FPS and also the file size you want to achieve (either match the original file's file size). Once you enter all of the information, the bitrate you need is calculated for you and the bitrate is automatically adjusted for you as well when you press "Accept". (Screen Shot Below)

One thing to note here is that to ensure maximum compatibility, try to make sure the bitrate isn't too high, as you may risk problems with skipping. The range of acceptable bitrate will vary from player to player (so check your player's manuals for more information). For my DVD player, it is below 1500 kbit/s for files burned on CDs and 3000 kbit/s for files burned onto DVDs.
Now, make sure "1-pass" encoding is selected. Also make sure it says "Home Theater Profile" in the "Certification Profile" box (blue). Then click the "OK" button after you have completed the above (green). Then click "OK" on the "Codec" screen after that. (Screen Shot Below)
For a more detailed explanation of profiles, and other DivX codec settings, please refer to this guide.
Using the DivX codec:
On this screen, select the DivX codec (red) , then click the "Configure" button (blue). (Screen Shot Below)
After clicking the "Configure" button, this screen will come up. As mentione earlier, you can enter in the original bitrate you wrote down in the first step in the "Bitrate box", mine was "819kb/s", so thats what I put there (red).
Or if you want something more precise, you can use the built in bitrate calculator by pressing the button with the picture of a calculator on it. Here, you'll need to enter some of the other information we took down from GSpot, such as the duration, the audio bitrate, FPS and also the file size you want to achieve (either match the original file's file size). Once you enter all of the information, the bitrate you need is calculated for you and the bitrate is automatically adjusted for you as well when you press "Accept". (Screen Shot Below)
One thing to note here is that to ensure maximum compatibility, try to make sure the bitrate isn't too high, as you may risk problems with skipping. The range of acceptable bitrate will vary from player to player (so check your player's manuals for more information). For my DVD player, it is below 1500 kbit/s for files burned on CDs and 3000 kbit/s for files burned onto DVDs.
Now, make sure "1-pass" encoding is selected. Also make sure it says "Home Theater Profile" in the "Certification Profile" box (blue). Then click the "OK" button after you have completed the above (green). Then click "OK" on the "Codec" screen after that. (Screen Shot Below)
For a more detailed explanation of profiles, and other DivX codec settings, please refer to this guide.
