


Page 1 of 1: IVTC in TMPGEnc
IVTC conversion allows NTSC DVDs with are encoded as 29.97 frame per second (usually TV based material, like documentaries, TV spots) to be converted to NTSC FILM at 23.976 frame per second, so it will play smoothly/without interlacing when converted to DivX or another format. IVTC is basically mandatory if you plan on converting an NTSC 29.97 video.This guide assumes that you have already made a DVD2AVI project file using this guide.
You should download the following software, which are required for this article :
- First of all, install TMPGEnc, and importantly, make sure you install the TMPGEnc VFAPI plugin (by running the file TMPGEncVFP_Install.bat).
- Start TMPGEnc. Cancel the "Wizards" window, since we won't be using it. In the "Video Source" input box, load in the DVD2AVI project file you created earlier. For this tutorial, I'll be using a clip from The Goonies DVD (Cyndi Lauper music video clip ;) - hence, a file called goonies.d2v for the DVD2AVI project file.
- Press the "Settings" button and go to the advanced section. For the "Video source type" select, select "Interlace". For "Source aspect ratio", you should select the option that DVD2AVI provided for you when you played back the clip in DVD2AVI. For "Video arrange Method", select "Full screen (keep aspect ratio)".
- I have deliberately left out the "Field order" setting from above, simply because this setting is a very important setting and there are some additional steps you need to do to figure out which setting you should select. To determine whether your "field order" is "field A" or "field B", do the following :
- Double click on the "Deinterlace" option to open the Deinterlace configuration window.

- Change "Method" to "Even-Odd field (field)".

- Now use the slider bar to skip to a part of the clip that has some video, and use the slider's "right advance" button to playback the movie.

- If the playback looks correct, then you have already selected the right field order. If the playback looks something like below (where you go forward a few frames, jump back 1 or 2, and then continue forward again), then you have selected the wrong field order and you should change it to the other field order setting.

- Remember to unselect the "Deinterlace" option when you close the current Deinterlace window, because we are only using the Deinterlace option to find out our field order, and nothing else.
- Double click on the "Deinterlace" option to open the Deinterlace configuration window.
- Now double click on the "Inverse Telecine" option. This should bring up the "Inverse Telecine" window.

- Click on the "Auto-setting" button, which should bring up the "Auto-setting" window. Click on the Start button to start the IVTC identification process.
- After a while, the "Auto-setting" should window should automatically close, and you should be returned to the main Inverse Telecine window. Now you'll notice that some of the frames above have been surrounded by a red border. Inverse Telecine actually removes certain frames (especially those with interlacing artifacts) when converting the movie from 29.97 to 23.976 frames per second. The red border signifies frames that are kept in the IVTC process.
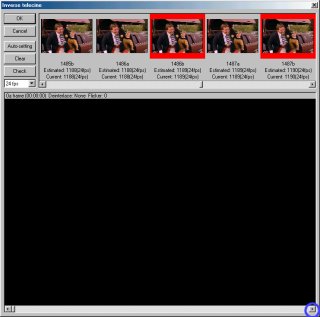
- You can now use the "right advance" button (see blue circle above) to playback the movie (now with only the IVTC selected/red bordered frames being played). The movie should play smoothly and without interlacing, which means IVTC has worked. Press the "OK" button to close the "Inverse Telecine" window. Press "OK" again to close the Settings window.
- Now for the final step - from the "File" menu, select "Save Project" to save the TMPGEnc project. This project file is the equivalent of the DVD2AVI project file, and most applications that suppot DVD2AVI project files will support the TMPGEnc project file. In case your program does not support TMPGEnc project files, you can use the VFAPI conversion tool to convert it to an AVI file (using the VFAPI codec). The following steps shows you how to convert the TMPGEnc project file to an VFAPI-AVI file, and therefore, is optional.
- Start the VFAPI conversion tool. Click on the "Add file" button and load in your TMPGEnc project file (.tpr). Press "OK" to close the window that opens and then press the "Convert" button to start the conversion. You should now have an IVTC converted VFAPI-AVI file that you can use with AVI capable applications.
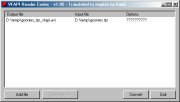
VFAPI conversion :
