 Guides

Page 1 of 1: Encoding a VideoCD using TMPGEnc
Version 1.0 (25 June 2002)
| Introduction | DVD DIGEST |
VideoCD (VCD) is the predecessor to DVD, and exists on CD media. Most DVD players will support the playback of VCDs, although not all DVD players can playback CD-Rs (check your player's manuals for more information).
This guide is intended to teach you how to convert your movie file to a VideoCD compliant MPEG-1 file using TMPGEnc for VideoCD authoring.
| Requirements | DVD DIGEST |
Software :
| Instructions | DVD DIGEST |
- Before we can burn a VCD, we need to ensure that you have a MPG file that is MPEG-1 and VCD compliant. In order for your MPEG-1 file to be VCD compliant, it must follow one of the following standards :
VCD Standard Resolution (width x height): Framerate (frames/sec): NTSC FILM 352x240 23.976 NTSC 352x240 29.97 PAL 352x288 25
- TMPGEnc can convert AVI files, as well as existing MPEG-1 files, to a VCD compliant MPEG-1 file. First, you'll have to find out how your current movie file is encoded, so you can convert it appropriately to one of the above VideoCD standards. This is done by checking the frame-rate of your current video, and to see if it is the same or a multiple of one of the above standard's frame-rate. You do not really want to do any unnecessary frame-rate conversion unless you absolutely have to, since frame-rate conversion can cause skipping, audio desynchronisation and will take longer.
For AVI files : - Right click on the AVI file and select "Properties". Go to the "Details" section and check under the "Video format" section for the frame-rate.

For MPG files : - load your current MPG file into a DVD player like PowerDVD or WinDVD and check the information that is displayed in the "information" section of these players.

- Once you know the frame-rate of your existing movie file, you can now choose to encode your VCD compliant MPEG-1 file to one of the standards above (NTSC, NTSC FILM or PAL) - just choose the format that matches your movie's frame-rate closest, or is a multiple of one of the above frame-rates (eg. if you movie has a frame-rate of 15, choose NTSC because 15 x 2 is roughly 29.97).
- Now start TMPGEnc. You should be presented with the "Project Wizard" selection windows (if it doesn't come up, press CTRL-W). Now expand the "Video-CD" tree and select the appropriate standard and press the "Next" button.

- Now load in your current movie file. The audio file should point to the same location as your movie file, unless you want to substitute the audio. Leave the other options on this page as they are (we'll come back to them later if you want to do additional processing on the movie file, like cropping). Press the "Next" button when you are finished here.

- The following screen details some of the optional filter/processing options we can use - we'll temporarily skip this step (press the "Next" button). Press the "Next" button when you are finished here.
- The second last screen allows you to choose the type of media you want to use to make the VCD. You should probably choose either the "CD-R 74min (VCD/SVCD)" or the "CD-R 80min (VCD/SVCD)" option. This window also shows you the amount of space the final video will take (on your 74/80 minute CD-R).
- The last screen allows you to choose the output location of your VCD compliant MPEG-1 file. The options further below allow you to process this conversion as a "batch" job (allowing you to convert many files at once, without having to stop in between), or to start up this job instantly (as a once off thing). If you wish to do additional processing/filtering on the input, deselect the "start encoding immediately" option now. Press "OK" when you are ready.
- If you chose the "start encoding immediately" option in the previous step, then encoding will start immediately. If not, you need to click on the "Start" button on the main TMPGEnc window to start the encoding. You can turn on the preview option from TMPGEnc's "Option" menu, and check to see if the encoded movie is correct - most likely, the aspect ratio (ratio of width/height) may be wrong and you'll need to do additional processing (see below) - this will be especially true if your input movie is a cropped widescreen one.

After encoding for a short while, you should now have a MPG file that is VCD compliant and ready to burn onto a CD-R. To find out how to burn a VCD compliant MPG file to CD-R as a standard VideoCD, please refer to this guide. - If you want to do additional processing such as cropping, please read on below for further instructions - note that the below instructions assumes you have followed the above steps and HAVE NOT yet encoded the VCD compliant MPG file (ie. you deselected the "start encoding immediately" option and have not pressed the "Start" button to start encoding).
Additional processing options :
Encoding only a section of the original input source :
- You may not want to encode the entire input file as a VCD, and this is why we may need TMPGEnc's "Source range" option to select the part you want to encode.
- To access the "Source range" option, click on the "Setting" button on the main TMPGEnc window. Go to the "advanced" section of the new window that pops up. Down below, select and then double-click on the "source range" option - a new preview window will pop up, and it is here that we'll tell TMPGEnc which part of the input movie we should encode.
- Use the slider to slide to the part of the movie you want to start encoding/conversion at, and then press the "Set start frame" button.
- Use the slider to slide to the part of the movie you want to stop encoding/conversion at, and then press the "Set end frame" button. Note that the part of the movie you want to convert/encode is now highlighted on the slider bar. Press "OK" when you have finished selecting the source range.

Cropping/Ensuring proper aspect ratio :
- If your input movie is a cropped widescreen movie (ie. when you play it back in a window, there are no black bars on top or bottom of the widescreen movie), then you'll need to do the following. Also, if your don't want TMPGEnc to encode the black bars of your existing non-cropped widescreen movie (not encoding the black bars will improve the picture quality), then you'll also need to do the following. You'll need to use TMPGEnc's "Clip frame" option.
- To access the "Clip frame" option, click on the "Setting" button on the main TMPGEnc window. Go to the "advanced" section of the new window that pops up. Down below, select and then double-click on the "Clip frame" option - a new preview window will pop up, and it is here that we'll tell TMPGEnc how the output movie will look in terms of aspect ratio (ratio of width/height).
- Click on the "Arrange setting" button and change the "arrange method" to "Full screen (keep aspect ratio" which will keep the aspect ratio of the original input movie.

- If your input movie is a cropped widescreen movie, then there is nothing else you need to do here, and you can exit the "Clip frame" option window now. If your input movie is a widescreen movie, but not cropped, then you should continue further below to crop the video.
- Click on the "Clip frame" button. Use the slider to skip to a scene in the movie that is high contrast (so you will be able to see the black bars in the film). Then, increase the "Top" and "Bottom" values until the black bars are completely gone.
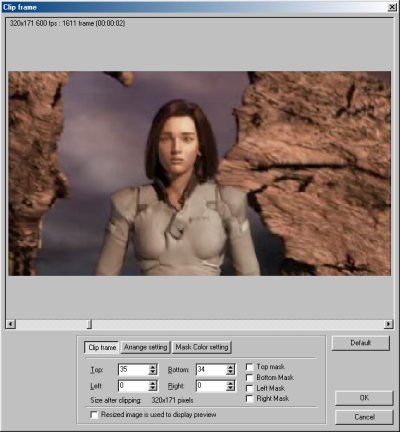
- Press "OK" when you are finished.
