 Guides


Page 1 of 1: DVD to VCD Conversion Guide
Version 1.0 (24 November 2002)
| Introduction | DVD DIGEST |
VideoCD (VCD) is the predecessor to DVD, and exists on CD media. Most DVD players will support the playback of VCDs, although not all DVD players can playback CD-Rs (check your player's manuals for more information).
This guide is intended to teach you how to convert your DVD to a VideoCD using DVD2AVI and TMPGEnc.
| Requirements | DVD DIGEST |
Software :
- BeSweet
- CD writing software with VCD support (eg. Nero Burning ROM)
- DVD2AVI
- TMPGEnc - make sure you install the VFAPI plugin as well by running the "TMPGEncVFP_Install.bat" file
| Instructions | DVD DIGEST |
Most of the processes required in this guide have already been covered by other available guides. The basic steps to this method of DVD to VCD conversion are as follows, and this guide is also divided into the following sections :
- Create DVD2AVI project file and AC3 audio file
- Convert AC3 audio using BeSweet
- Convert to VCD using TMPGEnc
- Burn VCD using CD writing software
Create DVD2AVI project file and AC3 audio file
- This guide uses TMPGEnc (later on) for encoding, but it does not support the reading of DVD VOB files. Creating a DVD2AVI project file allows you to create a file which acts as a pointer to the DVD VOB files, allowing applications to work with the VOB file without having to have VOB file reading capabilities, such as TMPGEnc.
- Please now follow the Creating a DVD2AVI Project File guide for detailed instructions on DVD2AVI project creation.
- The above guide link covers conversion to an AVI file using VFAPI - this is optional, since TMPGEnc can read both DVD2AVI project files and VFAPI AVI files.
Convert AC3 audio using BeSweet
- After you have finished creating the DVD2AVI project file, you should get two files : a D2V project file and an AC3 audio file. The following steps detail how to convert the AC3 file to a format that can be read by TMPGEnc for use in the next section. We're going to convert the AC3 file to a MP2 file, since this matches closest to what is being used as the VCD sound track (MPEG-1 Layer 2).
- Note that TMPGEnc can accept quite a few different audio formats, including WAV, MPA, MP2, and so, using BeSweet may be considered an overkill since we're going to convert the BeSweet converted audio file again in TMPGEnc anyway.
- The filename of the AC3 file that DVD2AVI outputs will tell you a lot about the AC3 file. For example, the file I got from The Goonies music video was named "goonies AC3 T06 2_0ch 192Kbps DELAY -52ms.ac3". What this means is that this AC3 file has 2 channels of audio (stereo), encoded at 192 Kbps and has a delay of -52 ms. Some of these facts will become important when we do BeSweet encoding, so please don't rename this file without writing down these values.
- Start the BeSweet GUI program (included in BeSweet package). Click on the "Azid 1" button to go to the Azid setup section.
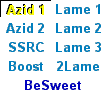
- "Azid 1" section :
- For the "Azid 1" section, you only need to change two values. The first is "LFE To LR Channels", which sets how the sub-woofer channel is downmixed into the Left and Right channels.
If your AC3 file has "3_2ch" of audio (as specified in the filename), it is a 5.1 channel file and you'll need to set the "LFE To LR Channels" value to to "-3". We do this because as we want to make the LFE a little less loud and not take over the LR channels completely during big explosions, for example.
If your AC3 file only has "2_0ch" of audio (as our Goonies file has), then there is no need to set this value (un-check this setting)

- The other setting you need to change is the "Dynamic Compression" option. Dynamic compression reduces the audio's dynamic range, evening out highs and lows and generally improving audio volume. Set this to "light" or "normal".

- For the "Azid 1" section, you only need to change two values. The first is "LFE To LR Channels", which sets how the sub-woofer channel is downmixed into the Left and Right channels.
- Click on the "2Lame" button to go to the 2Lame setup section.

- "2Lame" section :
- Change "Encoding Mode" to "joint stereo". Also change "Total Bitrate" to 224.

- Change "Encoding Mode" to "joint stereo". Also change "Total Bitrate" to 224.
- Click on the "SSRC" button to go to the SSRC setup section.
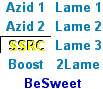
- "SSRC" section :
- Change "Set Sampling Rate of Output File to" "44100 Hz", since VCDs require 44100 Hz audio.
- Click on the "BeSweet" button to go to the BeSweet setup section.
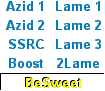
- "BeSweet" section :
- You need to first set the locations of BeSweet, the input and output files.

- The rest of the options can be set as follows :

Use AC3 Decoder - selected
Downconvert Sample Rate - selected
2Lame - set to "MP2"
Set Delay to - set to the "ms" that your DVD2AVI created AC3 file's filename indicates (eg. our Goonies file has -52 ms in the filename)
Auto Gain - selected
- You need to first set the locations of BeSweet, the input and output files.
- Click on the "AC3 to MP2" button to start the encoding process.

Convert to VCD using TMPGEnc
- You now have a DVD2AVI project file and a MP2 audio file. You can now use TMPGEnc to convert these files to a VCD compliant MPEG-1 (MPG) file.
- The instructions for doing this are covered in our "Encoding a VideoCD using TMPGEnc" guide. The only thing that may be a little different is that when the guide tells you to load in your current movie file, you should load in the DVD2AVI project file (D2V) for the video file and load in the MP2 file as your audio file (change the file type option to view "All Files" when trying to load the MP2 file).
- Please now follow the Encoding a VideoCD using TMPGEnc guide for detailed instructions on TMPGEnc VCD encoding.
Burn VCD using CD writing software
- We now have a VCD compliant MPEG-1 (MPG) file. We can now burn this file to a CD-R and make it a VCD.
- Please now follow the Burning a VCD guide for detailed instructions on burning your MPG file as a VCD.
