Page 2 of 4: Enabling H.264 playback in Media Player Classic (and Windows Media Player)
This section shows you how to enable H.264 playback in Media Player Classic (and Windows Media Player). If you can already play back the ".mp4" file within Media Player Classic or WMP, or if you plan on using a different player to test the software (as long as the file plays, it doesn't really matter which player you use), then you can skip this section and move straight on to the "Testing with Fraps" section.
Please note that the instructions below are purely for the purpose of testing high definition DVD playback. It does not give you a very usable configuration for ffdshow - it merely allows you to play back the ".mp4" file that will be used for this test (mp4 file with h.264 video and AAC audio - remember that mp4 files, like AVI files, can contain numerous types of video and audio codecs, and just because you can play one mp4 file it doesn't mean you can play them all).
Installing MPC:
Installing ffdshow:
Installing Haali Media Splitter:
Associating .mp4 files with MPC:

Alternatively, the file should also be playable in Windows Media Player, by simply dragging the mp4 file into WMP.
Please note that the instructions below are purely for the purpose of testing high definition DVD playback. It does not give you a very usable configuration for ffdshow - it merely allows you to play back the ".mp4" file that will be used for this test (mp4 file with h.264 video and AAC audio - remember that mp4 files, like AVI files, can contain numerous types of video and audio codecs, and just because you can play one mp4 file it doesn't mean you can play them all).
Installing MPC:
- Download the MPC version that is suitable for your operating system
- MPC is really just a single executable, so extract the .exe file to any directory you wish (eg. c:\Program Files\Media Player Classic\)
- Click on the .exe file to start MPC. Easy.
Installing ffdshow:
New Install:
- Download ffdshow and start the installation. Click "Next" until you get to the "Select Components" screen, and make sure you select the "VFW interface" option. Press "Next" to continue.

- When you reach the "Select Additional Tasks" screen, it will now allow you to select which codecs ffdshow will decode for you (if you already have ffdshow installed, the current selected decoders will be shown). Make sure at least the "H.264, X264" option is selected for the video and "AAC" is selected for the audio. You may select other options to allow ffdshow to be the decoder for these types of video as well, but that's optional.

- The "Postprocessing" and "Volume normalization" options further down is optional and for the purpose of this test, it is best to disable all post processing options as they can affect performance. ffdshow supports a lot of advanced postprocessing filters, such as video sharpening and audio effects. These can be configured later on (see "Existing Install" section below) as well.
- Press "Next" and then "Install" to start the installation. You do not need to run any of the configuration tools when presented with the option, so de-select them and press "Finish" to end the installation.
- Once ffdshow has finished installing, please go to the "Installing Haali Media Splitter" section below".
Existing Install:
- This section is for when you already have ffdshow installed on your system. From the start menu, go to the ffdshow folder and run the "video decoder configuration" program.

- In the "Codecs" section, make sure the "libavcodec" option is selected for "H.264". Press "Apply" and then "OK" to close this program.

- From the start menu folder again, select "Audio decoder configuration". In the "Codecs" section, make sure the "libfaad2" option is selected for "AAC". Press "Apply" and then "OK" to close this program.

- Certain older playback software and some conversion tools also require the VFW (Video For Windows) config to be made (this isn't necessary for this guide), and you can do this through the "VFW codec configuration" option again in the ffdshow start menu folder. Go to the "Decoder" section by clicking on the "Decoder" tab at the top, select "Codecs" and just like before, make sure the "libavcodec" option is selected for "H.264". Press "Apply" and then "OK" to close this program.

- ffdshow is now configured for H.264/AAC playback.
Installing Haali Media Splitter:
- This step is optional for MPC, but required for WMP.
- Download Haali Media Splitter
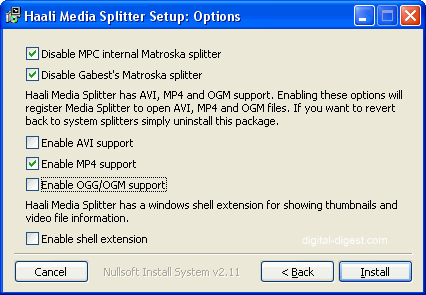
- Run the installer and when you get to the option select step, make sure the "Enable MP4 support" option is selected.

Associating .mp4 files with MPC:
- Right click on the ".mp4" you are using for this test. From the menu that opens, select the "Open With -> Choose Program" option, or if it isn't there, select "Open".
- Click on "Browse" and locate your MPC .exe file (eg. c:\Program Files\Media Player Classic\mplayerc.exe). Select the "Always use the selected program ..." option if you want to make the association permanent. Press "OK" to close the window.

Alternatively, the file should also be playable in Windows Media Player, by simply dragging the mp4 file into WMP.

 Home
Home


