VobSub Subtitle Ripping, Playback and Permanent Subtitle GuideOriginal Page URL: http://www.divx-digest.com/articles/article_vobsub_page1.htmlAuthor/Publisher: jmet Date Added: Dec 17, 2005 Date Updated: Dec 17, 2005 This guide shows you how to use VobSub/DirectVobSub and related tools for subtitle ripping, playback and encoding (turning subtitles files into hard-coded subtitles). Software you will need:Make sure you download and install both VobSub (needed for subtitle extraction) and VSFilter/DirectVobSub (needed for playback). If you plan on turning subtitle files (in text formats) into hard-coded/burnt subtitles (for players that do not support separate subtitle files), then during the installation of VobSub, make sure the "TextSub" option is selected. Alternatively, you can simply download this WinRAR package, and extract the "textsub.vdf" file to your VirtualDub "plugins" directory (eg. "C:\Program Files\VirtualDub\plugins").  How to rip the subtitle files.After you have downloaded and installed both VobSub and the VSFilter/DirectVobSub, click "Start", then click "Run", then type in either "cmd" or "command". After clicking "OK", the "MS-DOS" command prompt window will pop up. (Screen Shot Below)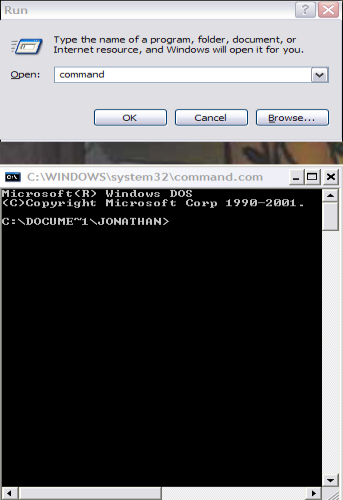 We need to be in the same directory as vobsub.dll . (I did a search on my hard drive for "vobsub.dll" to see what directory it was actually in. It was in the "C:\WINDOWS\system32" directory, so I need to get to that directory in my MS-DOS prompt window.) On the "MS-DOS prompt window, type in "cd.." to change directors (every time you type cd.. and steps up/back one directory) I did that until I got back to the "C:" directory. From there you now type "cd Windows" to get to the "C:\WINDOWS" directory. Now I need to get to the "system32" directory, so I typed in "cd system 32". Ok now that we are in the same directory as "vobsub.dll", we need to type this command and press "Enter". "rundll32 vobsub.dll,Configure" (without the quotation marks!) and then press "Enter". (Screen Shot Below) 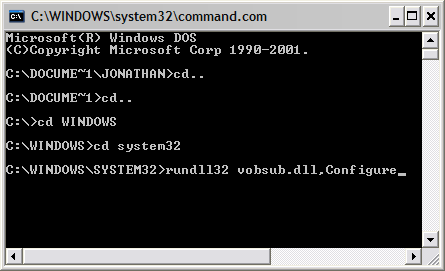 After pressing "Enter", this screen should come up. Go ahead and click the "Open" button and select the ".IFO" file of the movie you wish to extract the subtitles from. (After selecting the .IFO file, a screen will pop asking you to select a folder. It says "Approximately 30GB free space needed". Ignore 30GB of free space, just select the folder.) (Screen Shots Below) 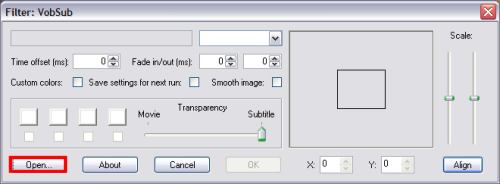 Make sure you change/select the "Files of Type" to show .IFO files. (Screen Shot Below) 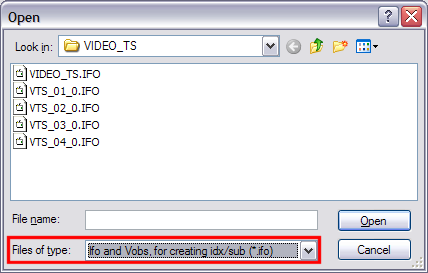 After you select the .IFO file, this screen will come up 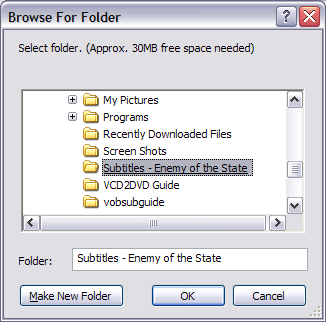 After you select the "Folder", this screen will pop up. On the right side (the green box), it shows you all the subtitle streams that VobSub found. If you would like to remove any or add some other streams, you can just select them and press the  button (to add) and the button (to add) and the  button (to remove) to add and remove streams. On the left hand side (Blue Box), here it tells you what PGC (Program Chain) was selected. By default VobSub automatically selects "Program chain no.1". Make sure "Reset time at the first included vob/cell" has a check mark in the box (Red box). After that, click the "OK" button. (Screen Shot Below) button (to remove) to add and remove streams. On the left hand side (Blue Box), here it tells you what PGC (Program Chain) was selected. By default VobSub automatically selects "Program chain no.1". Make sure "Reset time at the first included vob/cell" has a check mark in the box (Red box). After that, click the "OK" button. (Screen Shot Below)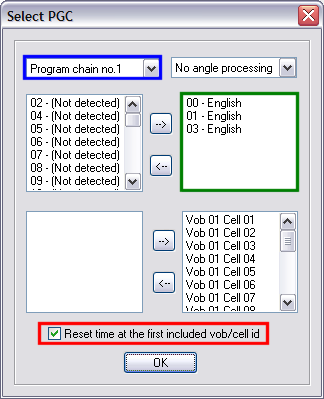 After clicking "OK" on the previous screen, VobSub will start "Indexing" the file (time it takes will vary). After "Indexing", this screen will pop up. Select the appropriate subtitle language etc. (red box) and set the colors of your subtitles and their transparencies (blue box). You can also move them to a different spot, if you don't like were they are originally located (green box). After all that, go ahead and press the "OK" button. (Screen Shot Below) 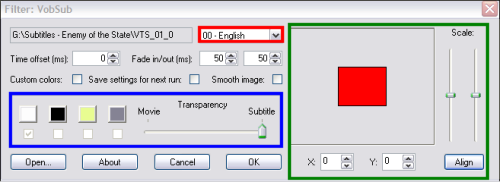 After a while when it's done indexing press OK to get back to the filter selection. VobSub will have created 3 new files in the directory you indicated before (to save the index file). These files are named like your ifo file, for instance in our case vts_01_0.ifo, vts_01_0.idx and vts_01_0.sub. Rename these 3 files so that they have the same name as your AVI file. For instance if your AVI is called matrix.avi rename vts_01_0.ifo to matrix.ifo, vts_01_0.idx to matrix.idx and vts_01_0.sub to matrix.sub. You can also compress the .sub file using WinRar. When VobSub gets done Indexing (times will vary), press the "OK" button to return to the "Filter Selection" How to cut the video file with the VirtualDub if needed. (Optional)Software you will need:The cutting part if optional, it's only needed if you need to split the AVI files onto 2 CDs.Guide for this part is located here. How to playback the video with ripped subtitles.After completing the previous steps, you should be left with a ".idx and .sub" file. Go ahead and move your video file (.avi or other) to the same directory (or vise versa, move your .idx and .sub files to the directory of your .avi file). Make sure all your files have the same name (Rename them if you have to). (Screen Shot Below)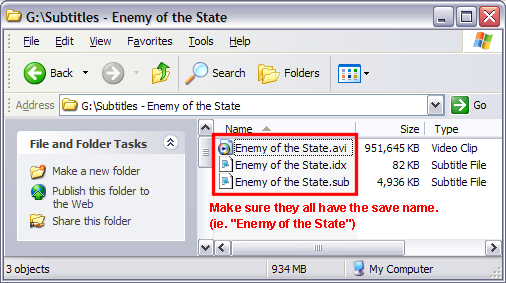 After that go ahead and double click your video file (.avi or similar) and it should now play with subtitles. Not all players (ie.Windows Media Player, Nero Showtime, etc.) will be able to play it with the subtitles. That is why I recommend Media Player Classic (MPC). If you have MPC, right click the .avi file, then choose "Open With", and choose Media Player Classic (MPC). (Screen Shot Below) 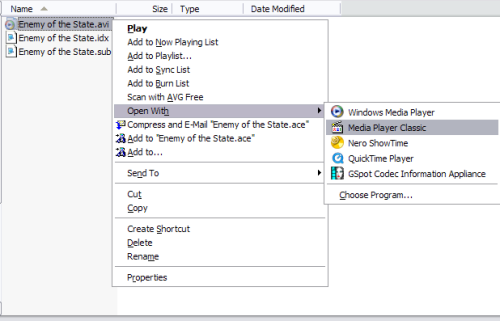 Thats it! It should now play with the subtitles. (Screen Shot Below)  How to turn subtitle files into burnt-in (hard-coded) subtitlesThis section shows you how to turn subtitle files (eg. *.sub, *.srt, *.ssa ...) into hard-coded subtiltes that are burnt into the AVI file, using VirtualDub and the TextSub plug-in. The advantage of doing this over having a separate subtitle file is that this allows subtitles to be displayed when the player (software or hardware) does not support subtitles. The disadvantage, of course, is that subtitles can't be turned off and you will need to re-encode the video. Before we get started, please note that while some basic instructions will be covered, it is recommended that you know about DivX/XviD encoding. Start VirtualDub and load in your AVI file. From the "Video" menu, select "Filters". In the window that opens, press the "Add" button and select the "TextSub 2.x" filter, press "OK" to load the filter.   A new window should open. You can configure the word-wrapping style, but the default selection (\q0) should be fine. Use the "Open" button to load in your subtitle file, and then click on the "Styles" button to open a new window where you can configure the style of the subtitle display.   The style options are all fairly obvious, but if you need more help, this short guide will explain all the options. You can make changes here and then preview these changes by closing the filter windows to go back to the main VirtualDub screen, and using the output preview display (the right hand side of the two video displays - the left hand side one is the original/input video preview - you can resize the left hand side so you can see the output preview in full). You might need to use the seek slider to move the video around a bit before you can see the changes. To make more changes, from the "Video" menu, select "Filters" (this should show a list of filters you've applied to the video), select the "TextSub" filter and press the "Configure" button (and then the "Styles" button to change the styles).  Once you are happy with the subtitles, we will now need to re-encode the video to include the burnt in subtitles. As mentioned before, this guide will not cover the video re-encoding instructions, but you can read a quick reminder of how it's done here in our VirtualDub: Two Pass Encoding short guide. |