Menu Editor
Bring up the main menu editor for a button either by:
· Right clicking on a menu button or
· Selecting the button and clicking Edit

This shows the full editor screen.
· Use the Select button slider and the Group radio buttons to select the button and group to edit. You may edit in All mode if you are happy not to have any differences in a button's parameters (size, position, adjacent buttons, command and colour scheme) between the groups (this is usual).
A 16:9 menu has several groups (2 or 3 depending on the menu’s display modes). All the characteristics of a button are stored independently in each group. That means that the button’s command or adjacent buttons, for example, may be different in each group. Since usually, only the positions and sizes of the buttons differ in each group, you may edit a button in all groups at once by checking the “All” box, and the changes to the current group will be applied automatically to all other groups.
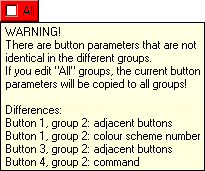
IMPORTANT: When editing a button in a specific group (“All” is unticked), the changes are stored in that group ONLY! It is therefore important to return to the “All” mode as soon as possible! Note also that if the “All” group appears in red, there are different values (other than the button’s position and size) in the various groups for the current button. It is pink when there are no differences for the current button, but there are differences for some of the other buttons. In that case, move the button selector slider until the “All” group turns red to select the button with the differences.
If the “All” group is red or pink, you may hover over it to see a tooltip containing a summary of the differences between groups for each button.
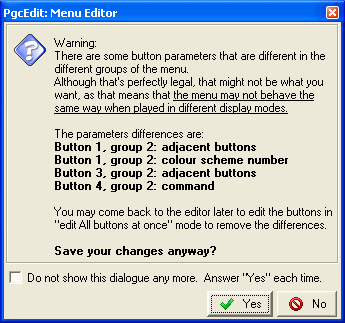
In addition, if you decide to keep the differences in a 16:9 menu (by clicking OK), PgcEdit will warn you of the impending changes, giving you a chance to discard them.
· You may edit the horizontal (X) and vertical (Y) positions and sizes of the selected button. As you move the sliders to edit the button’s position and size, you will get an immediate view of your edits in the Menu Viewer.
Those values are normally different for each group of a 16:9 menu, since the aspect ratio of the background image is different. However, you don’t need to adjust them separately for each group. When the “All” box is checked, the values of the sliders are computed automatically by PgcEdit so that the rectangle will be placed at the same position over the background of the other groups. However, in some cases, the highlights may be placed intentionally at different positions in each group. If any of the position or size values of a button are notably different between the various groups, PgcEdit highlights the corresponding sliders in yellow, to warn you that you may need to adjust these values separately for each group. Do this by unchecking the “All” checkbox and selecting the group to edit. (Note: To confirm if you need to edit the groups independently, use DVDSubEdit to inspect the subpic highlights in all groups and verify if they really are placed in different positions).
Note that the positions and sizes of the buttons are not relevant to whether the “All” box is red, as there are normally differences between groups for these parameters. You can check to see the buttons are the right size, not only visually, but by using the Edit button slider and the Group selector to move between buttons and groups and see the other buttons’ heights, widths and positions.
· The adjacent button sliders are used to define which button is selected when the user presses up, down, left or right on the remote control. You can check if all the buttons are accessible with the remote by using the cursor keys on the keyboard. Check Show adjacent buttons down the bottom of the GUI to get a visual idea of which buttons are next to the selected button in the menu viewer.
· Use the Colour schemes radiobuttons to assign a colour scheme to a specific button. The colour scheme determines the colour and opacity of the button highlight for the two states of the buttons (highlighted and activated).
PgcEdit has a full colour schemes editor. Access this by clicking Edit Colour Schemes. You may edit 1 of 3 schemes for the cell (the default scheme, which is usually completely transparent, uses the values stored in the subpic packs of the PGC and consequently, is not able to be edited with PgcEdit, but may be with DVDSubEdit). The colours for these schemes are defined in the sub-picture colour lookup table, which is only editable in the PGC Editor. Note that the colour schemes are global to the whole menu cell. Only the assignment of a scheme to a button is specific to that button.
· You may edit the button’s command with the Command Editor. (Note that the command may be edited directly from the Menu Viewer, without having to open the Menu Editor first).
· Check Auto Activate to make the button execute the command simply by selecting it with the remote (no “enter” required). This is usually used to execute a command automatically for invisible buttons (e.g. on a scene selection menu to move to the previous or next page).
· Ticking Advanced opens the lower panel, where you can:
– Change the number of numerically selectable buttons (buttons activated by pressing numbers on the remote)
– Force selection of a particular button for the cell (this ignores the value in SPRM 8 and always highlights what you have selected)
– Force which button to execute (if you like) after a specific delay. This is only valid for animated (non-still) menus.
Note that the advanced controls are global to the menu cell, and are not specific to a button or a group.