Colour Scheme Editor
This is not the place to explain all there is about how colour schemes work in menus. For an excellent reference, see www.mpucoder.com/DVD. Suffice to say that you may define 3 colour schemes in each PGC and apply any one of these schemes to any particular button in the PGC. Colour Scheme 0 (the default scheme) is special, and cannot be edited by PgcEdit because it is defined in the VOB. Use DVDSubEdit to inspect or edit it.
The button highlights are defined in the sub-picture streams of the menu. Each pixel in the sub-pic data may be assigned one of 4 values – these are called Background, Pattern, Emphasis 1 and Emphasis 2, and are easily editable in PgcEdit.
Background is usually used to define the background colour of the button, while Pattern usually defines the colour of the pattern of the button’s shape although this is not always true.
Bring up the colour editor by clicking on Edit Colour Schemes in the Menu Editor.
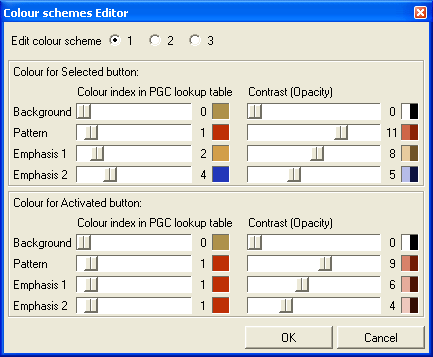
A colour scheme is defined for each of two button states:
· The colour and contrast for when the button is selected (i.e. button highlighted but not pressed)
· The colour and contrast for when the button is activated (i.e. button pressed)
Colour schemes pick a colour from the PGC’s sub-picture colour lookup table (CLUT) – editable in the PGC Editor. The numbers range from 0 to 15, corresponding to the 16 colours defined in the PGC’s CLUT. If your desired colour for a particular scheme is not there, you may change it from the PGC Editor, but beware that by changing a colour in the CLUT, you will also change other colour schemes that use this colour for this PGC.
To pick one of the 16 colours from the lookup table, simply move the slider from 0 through 15 until you’ve selected your desired colour for that particular parameter.
The way a button is actually displayed depends not only on the colour but on its contrast. You may set the contrast for any of B, P, E1 and E2 – from 0 (fully transparent) to 15 (fully opaque – i.e. a solid colour). By moving the sliders, you can get an idea of how the opacity will vary with each step from 0 to 15.
After this is complete, it is simply a matter of assigning which colour scheme pertains to which button on the menu. Do this in the Menu Editor
One really easy way of seeing how your edits look is to load the menu in DVDSubEdit. Use Ctrl-n and Ctrl-p to cycle through the buttons and Ctrl-q to switch between Selected and Activated modes. You can also manipulate the actual button highlights using an external graphics editor.