DivX 5.x Codec Setup Guide
Original Page URL: http://www.divx-digest.com/articles/divx5_setup.html
Author/Publisher: Digital Digest
Date Added: Mar 30, 2002
Date Updated: Aug 14, 2004
Select the "DivX Pro 5.2.x Codec" (depending on your version of the DivX codec - eg. "DivX Pro 5.2.0 Codec") in the codec selection section of your video conversion/encoding software. Press the "Configure" button or whatever button that let you configure the codec settings, and you should now have access to the configuration options described below (see screenshot below).

We'll now go through the three major encoding methods (1-pass, 1-pass quality-based and multi pass encoding), and press the links in the steps to find out more about the configuration option. Please also refer to the official DivX guide (large file) for more detailed and technical information on these feature - this guide will provide a quick run through of all the information needed for encoding, while the official guide offers more detailed explanations and technical information.
1-Pass Encoding :
1-pass encoding is the quickest way to encode your video in the DivX format, at the expense of some quality - it allows you to set a fixed average bit-rate to use for the entire encoding. The steps for 1-pass encoding are as follows :
1-Pass Quality-Based Encoding :
1-pass quality-based combines some ideas from multi-pass encoding with the quickness offered by single pass encoding - you get to select the quality of the output (using a constant quantizer setting), as opposed to the bit-rate (which will be adjusted accroding to the quantizer you've selected and the source video). The steps for 1-pass quality-based encoding are as follows :
Multi-Pass Encoding :
Multi-pass encoding is the best way to achieve maximum quality with the DivX format, at the expense of encoding speed. The passes of a multi-pass encoding gathers information regarding the source video and then the subsequent pass use this information to dynamically adjust the size of the output, to get the best ratio between the specified output file size and video quality. Multi-pass encoding includes at least 2 passes. The steps for multi-pass encoding are as follows :
DivX Pro 5.2.x Codec Configuration Reference
Profiles Setup :
1. Open the Profile Wizard
Profiles are pre-programmed settings for the DivX codec that conform to standards set by DivX.com, hence ensuring maximum compatibility with DivX devices. This will make sure your encoded video files are compatible with DivX enabled devices that are available on the market (like standard DVD/DivX players).
To select a profile, click on the "Select DivX Certified Profile" button.
2. Step 1 - Select a DivX Certified Profile
Here, you can select the preset DivX profiles to use. The four profiles currently available are Handheld, Portable, Home Theatre and High Definition, and a description is provided for them in this screen.
If you de-select "DivX Certified", this will basically allow you to have access to more options, but at the expense of compatibility.
3. Step 2 - MPEG4 Tools
These options allows you to select the three special encoding methods that will try to improve the quality of the encoding, while decreasing the file size.
DivX's use of profiles limits the use of these tools, and you may only be able to select some of these options if you disable the use of profiles.
Use Quarter Pixel - Quarter pixels increases the resolution of motion search, and hence, will improve quality, especially with the fluidity in motion of objects in the distance. The motion search resolution is increased, the search time will be longer and hence, encoding time will be longer as well.
Use GMC - Global Motion Compensation (GMC) is useful in improving the quality of scenes where lots of movement (especially panning, zooming) occur. You should enable this option. Not available when profiles are used
Bidirectional Encoding - Bidirectional encoding allows for the use of B frames in the encoding, in addition to the I-frame (data for this frame is completely stored) and the P-Frame (predicted frame). There are two available options, "Adaptive Single Consecutive" and "Adaptive Multiple Consecutive", otherwise known as single and multiple B frames (may not be supported by DivX certified devices). It is recommended that you enable this option, although if you use high bit-rates or have set performance/quality to "Fastest", it's better to not enable it. Not available for the "Handheld" profile
4. Step 3 - Profile Validation
If you didn't disable profiles, then you will be able to enter the resolution/framerate of your video. Doing this allows the DivX codec to check that your encoded video will conform to whatever profile/standard you have selected, although it will not affect the actual video encoding. Press "Finish" to end profile configuration.
General Setup :
Encoding Performance :
Determines tradeoff between performance and quality. Leaving it as Standard gives you the best possible picture/encoding speed ratio, but the "Fast" option has been improved in DivX 5.2 to provide a good quality with added performance gain. The graphic on the right provides a good indication of the quality/speed tradeoffs. A setting of Standard correponds to the "Slowest" setting in the 5.0 version of the DivX Codec, and this is the recommended setting (the quality gains from setting it to a slower setting may not be worth the trouble). If you really want to use the "Slow" or "Slowest" settings (which uses a new "rate-distortion" algorithm), then use it during the last pass, as otherwise, the encoding will take hours for just a minute of video. Not available when Quarter Pixel MPEG4 mode is selected.
Encoding Mode :
Choose the type of encoding method for this codec.
1-pass encoding is similar to DivX 3.11 Alpha's "low motion" encoding, allowing you to specify an adverage bit-rate, which the encode will try to achieve.
1-pass quality-based encoding is basically constant quantizer encoding (same quantizer used for every frame, and the bit-rate will be adjusted to ensure the quantizer/quality level is reached), but you specify the quality of the output (using the "Quantizer" slider - the lower the quantizer, the higher the quality. Think of the "%" value given as the quality as defined by a percentage of the original source quality), rather than the bit-rate directly. File size, unfortunately, becomes unpredicatable as a result. This option is not available when a profile is selected.
multi-pass is the best encoding option (for smallest file size, and best quality) - multi-pass encoding takes longer than 1-pass encoding : the encoding time is roughly the encoding time of a "1-pass" encoding multiplied by the number of passes (eg. 2-pass takes twice as long, 3-pass takes three times as long ...), but the results may be worth it - multi-pass uses the bitrate you selected as appropriately as possible, to give you both an accurate file size and the best possible looking picture given that bitrate.
DivX 5.0.3 Pro added Nth pass encoding. Previously, only 2-passes were available. Now, you can have as many passes as you want, with each pass giving the DivX codec more information to work with, and hence, achieve a higher quality encoding (at the expense of time, of course). Note that it is very hard to achieve any noticeable quality improvments after 3-passes.
Using Nth pass encoding is similar to using 2-pass encoding : you have a common first pass using the "Multipass - 1st pass", and then subsequent passes can be performed using the "Multipass - nth pass" settings.
Bitrate Calculator :
DivX 5.2 now has a built-in bit-rate calculator, which can help you figure out the exact bit-rate you need to ensure the output file is limited to a certain size. The idea here is to provide the length of the video and the audio properties, and then enter a desired file size to get the required bit-rate.
Encoding bitrate :
This is the bit rate setting for the video. A setting of 1500 will produce very good quality video (lower will mean a smaller file size, but poorer quality). Don't go below 650 (650-1000 for 1 CD movies), and there is probably not too much point in going over 2000 (1300-2000 for 2 CDs).
Bitrate modulation : - (for "Multipass - nth pass" mode only)
This allows you to tell how much motion your source video has, and let the DivX codec decide on the best way to encode this video source. Drag the slider towards "high-motion" or "low-motion" depending on your source. As an example, an action movie will usually have lots of high-motion scenes (where the camera pans and zooms quickly), and a drama will probably have lots of low-motion scenes. Selecting the right bitrate modulation setting will help the DivX codec to better use available bit-rate.
Multipass encoding log files :
Log file - 2-pass encoding requires the information in the first pass to be stored in a LOG file - you can specify the location to store the log file by using this option. You can also specify whether to write/update this log file (the log file only needs to be updated if you plan on doing another pass after the current pass).
MV file - DivX 5.2.x adds MV files, which contains Motion Vector data. This type of logging is no longer recommended by DivXNetworks.
Video Setup :

Psychovisual Enhancement :
Just like how MP3 encoding removes bits that the human ear can't hear, to decrease file size, psychovisual enhancement does the same with the video.
Enable Crop :
Cropping allows you to remove a part of the picture that you don't want encoded - for example, the black bars on widescreen movies (they will be added back by your DivX player anyway, so there is no point wasting bitrate on them). Generally, your conversion tool will have a similar feature, so you should just disable and ignore this section.
Enable Resize :
Same deal as cropping, except this is for resizing the overall picture - you should just disable and ignore this section.
Advanced :
Source Pre-processing :
This option should really be renamed to "Noise Reduction", as this is what it really does. Unless your source has lots of noise in it (which shouldn't be the case if you are converting from a DVD), so you should just disable it.
Scene change threshold
This setting determines the percentage of blocks not tracked by the motion search algorithm to trigger a scene change. Leave this at 50%, but if you do need to change it, make sure it is between 40% and 60%. This option is ignored when the "Performance/Quality" mode is set to "Slowest".
Interlacing :
You can encode the video as progressive or interlaced. If your original source is interlaced, then encoding it as interlaced may result in a better looking picture, although it may increase file size. Similarly, encoding the video as progressive if the source is progressive will be benefitial. There are many ways to check if your video source is interlaced or progressive, but using DVD2AVI and checking for the "Frame Type" is a good way to achieve this.
The last option allows you to "Deinterlace all frames", which is just a way to convert the interlaced source into a progressive one. This is not really recommended, as it can lower picture quality.
Max Keyframe interval
Keyframes helps you to skip forward/backwards (seek) through the movie (when you skip, the picture has to land on a keyframe first). Keyframe are automatically inserted at scene changes, but in case you have a movie where the scene never changes, then set this to a reasonable value to avoid having no keyframes. For example, you can insert a keyframe every 10 seconds by multiplying the framerate of the movie (eg. 23.976 or 25 or 29.97) by 10 (eg. 240, 250, 300), and entering it here. Keyframes will still be inserted at scenes changes, but if the interval between keyframes (or scenes) is greater than the specified number of frames, then another keyframe will be inserted.
Quantization Type
New in DivX 5.2, you can now select between H.263 and MPEG-2 quantization. The recommended quantization is H.263 (the DivX 5 standard), and is recommended for low to high bit-rates. MPEG-2 quantization may not be supported by all DivX certified devices, and hence only recommended for very high bit-rate videos, but with possibly increased artifacts for other types of videos.
Select the "DivX Pro 5.1.x Codec" (depending on your version of the DivX codec - eg. "DivX Pro 5.1.1 Codec") in the codec selection section of your video conversion/encoding software. Press the "Configure" button or whatever button that let you configure the codec settings, and you should now have access to the configuration options described below (see screenshot below).
We'll now go through the three major encoding methods (1-pass, 1-pass quality-based and multi pass encoding), and press the links in the steps to find out more about the configuration option. Please also refer to the official DivX guide (large PDF file) for more detailed and technical information on these feature - this guide will provide a quick run through of all the information needed for encoding, while the official guide offers more detailed explanations and technical information.
1-Pass Encoding :
1-pass encoding is the quickest way to encode your video in the DivX format, at the expense of some quality - it allows you to set a fixed average bit-rate to use for the entire encoding. The steps for 1-pass encoding are as follows :
1-Pass Quality-Based Encoding :
1-pass quality-based combines some ideas from multi-pass encoding with the quickness offered by single pass encoding - you get to select the quality of the output (using a constant quantizer setting), as opposed to the bit-rate (which will be adjusted accroding to the quantizer you've selected and the source video). The steps for 1-pass quality-based encoding are as follows :
Multi-Pass Encoding :
Multi-pass encoding is the best way to achieve maximum quality with the DivX format, at the expense of encoding speed. The passes of a multi-pass encoding gathers information regarding the source video and then the subsequent pass use this information to dynamically adjust the size of the output, to get the best ratio between the specified output file size and video quality. Multi-pass encoding includes at least 2 passes. The steps for multi-pass encoding are as follows :
DivX Pro 5.1.x Codec Configuration Reference
Profiles Setup :
1. Open the Profile Wizard
Profiles are pre-programmed settings for the DivX codec that conform to standards set by DivX.com, hence ensuring maximum compatibility with DivX devices. This will be more helpful in the future, when DivX enabled devices are available, and you want to make sure your DivX encodings will playback on these devices.
To select a profile, click on the "Select Profile Wizard" button.
2. Step 1 - Profile Select?
Here, you can select the preset DivX profiles to use. The four profiles currently available are Handheld, Portable, Home Theatre and High Definition, and a description is provided for them in this screen.
If you choose "Disable Profiles", this will basically allow you to have access to more options, but at the expense of compatibility.
3. Step 2 - MPEG4 Tools
These options allows you to select the three special encoding methods that will try to improve the quality of the encoding, while decreasing the file size.
DivX's use of profiles limits the use of these tools, and you may only be able to select some of these options if you disable the use of profiles.
Use Quarter Pixel - Quarter pixels increases the resolution of motion search, and hence, will improve quality, especially with the fluidity in motion of objects in the distance. The motion search resolution is increased, the search time will be longer and hence, encoding time will be longer as well.
Use GMC - Global Motion Compensation (GMC) is useful in improving the quality of scenes where lots of movement (especially panning, zooming) occur. You should enable this option. Not available when profiles are used
Use Bidirectional Encoding - Bidirectional encoding allows for the use of B frames in the encoding, in addition to the I-frame (data for this frame is completely stored) and the P-Frame (predicted frame). This option also increases quality, so enable it as well. Not available for the "Handheld" profile
4. Step 3 - Profile Validation
If you didn't disable profiles, then you will be able to enter the resolution/framerate of your video. Doing this allows the DivX codec to check that your encoded video will conform to whatever profile/standard you have selected, although it will not affect the actual video encoding.
General Setup :

Performance/quality :
Determines tradeoff between performance and quality. Leaving it as Standard gives you the best possible picture/encoding speed ratio. A setting of Standard correponds to the "Slowest" setting in previous version of the DivX Codec, and this is the recommended setting (the quality gains from setting it to a slower setting may not be worth the trouble). If you really want to use the "Slow" or "Slowest" settings (which uses a new "rate-distortion" algorithm), then use it during the last pass, as otherwise, the encoding will take hours for just a minute of video. Not available when Quarter Pixel MPEG4 mode is selected.
Variable bitrate Mode
Choose the type of encoding method for this codec.
1-pass encoding is similar to DivX 3.11 Alpha's "low motion" encoding, allowing you to specify an adverage bit-rate, which the encode will try to achieve.
1-pass quality-based encoding is basically constant quantizer encoding (same quantizer used for every frame, and the bit-rate will be adjusted to ensure the quantizer/quality level is reached), but you specify the quality of the output, rather than the bit-rate directly. File size, unfortunately, becomes unpredicatable as a result. This option is not available when a profile is selected.
multi-pass is the best encoding option (for smallest file size, and best quality) - multi-pass encoding takes longer than 1-pass encoding : the encoding time is roughly the encoding time of a "1-pass" encoding multiplied by the number of passes (eg. 2-pass takes twice as long, 3-pass takes three times as long ...), but the results may be worth it - multi-pass uses the bitrate you selected as appropriately as possible, to give you both an accurate file size (good if you are using bitrate calculators - make sure you get a DivX 4.x/5.1.x compatible calculator) and the best possible looking picture given that bitrate.
DivX 5.0.3 Pro added Nth pass encoding. Previously, only 2-passes were available. Now, you can have as many passes as you want, with each pass giving the DivX codec more information to work with, and hence, achieve a higher quality encoding (at the expense of time, of course). Note that it is very hard to achieve any noticeable quality improvments after 3-passes.
Using Nth pass encoding is similar to using 2-pass encoding : you have a common first pass using the "Multipass - 1st pass", and then subsequent passes can be performed using the "Multipass - nth pass" settings.
Quantizer : - (for "1-pass quality-based" mode only)
The lower the quantizer, the higher the quality. Think of the "%" value given as the quality as defined by a percentage of the original source quality.
Encoding bitrate :
This is the bit rate setting for the video. A setting of 1500 will produce very good quality video (lower will mean a smaller file size, but poorer quality). Don't go below 650 (650-1000 for 1 CD movies), and there is probably not too much point in going over 2000 (1300-2000 for 2 CDs).
Bitrate modulation : - (for "Multipass - nth pass" mode only)
This allows you to tell how much motion your source video has, and let the DivX codec decide on the best way to encode this video source. Drag the slider towards "high-motion" or "low-motion" depending on your source. As an example, an action movie will usually have lots of high-motion scenes (where the camera pans and zooms quickly), and a drama will probably have lots of low-motion scenes. Selecting the right bitrate modulation setting will help the DivX codec to better use available bit-rate.
Multipass encoding log files :
Log file - 2-pass encoding requires the information in the first pass to be stored in a LOG file - you can specify the location to store the log file by using this option. You can also specify whether to write/update this log file (the log file only needs to be updated if you plan on doing another pass after the current pass).
MV file - DivX 5.1.x adds MV files, which contains Motion Vector data. This type of logging is no longer recommended by DivXNetworks.
Video Setup :
Psychovisual Enhancement :
Just like how MP3 encoding removes bits that the human ear can't hear, to decrease file size, psychovisual enhancement does the same with the video.
Enable Crop :
Cropping allows you to remove a part of the picture that you don't want encoded - for example, the black bars on widescreen movies (they will be added back by your DivX player anyway, so there is no point wasting bitrate on them). Generally, your conversion tool will have a similar feature, so you should just disable and ignore this section.
Enable Resize :
Same deal as cropping, except this is for resizing the overall picture - you should just disable and ignore this section.
Advanced :
Pre Processing Source :
This option should really be renamed to "Noise Reduction", as this is what it really does. Unless your source has lots of noise in it (which shouldn't be the case if you are converting from a DVD), so you should just disable it.
Scene change threshold
This setting determines the percentage of blocks not tracked by the motion search algorithm to trigger a scene change. Leave this at 50%, but if you do need to change it, make sure it is between 40% and 60%. This option is ignored when the "Performance/Quality" mode is set to "Slowest".
Source Interlace :
You can encode the video as progressive or interlaced. If your original source is interlaced, then encoding it as interlaced may result in a better looking picture, although it may increase file size. Similarly, encoding the video as progressive if the source is progressive will be benefitial. There are many ways to check if your video source is interlaced or progressive, but using DVD2AVI and checking for the "Frame Type" is a good way to achieve this.
The last option allows you to "Deinterlace all frames", which is just a way to convert the interlaced source into a progressive one. This is not really recommended, as it can lower picture quality.
Max Keyframe interval
Keyframes helps you to skip forward/backwards (seek) through the movie (when you skip, the picture has to land on a keyframe first). Keyframe are automatically inserted at scene changes, but in case you have a movie where the scene never changes, then set this to a reasonable value to avoid having no keyframes. For example, you can insert a keyframe every 10 seconds by multiplying the framerate of the movie (eg. 23.976 or 25 or 29.97) by 10 (eg. 240, 250, 300), and entering it here. Keyframes will still be inserted at scenes changes, but if the interval between keyframes (or scenes) is greater than the specified number of frames, then another keyframe will be inserted.
Select the "DivX Pro 5.0.x Codec" (depending on your version of the DivX codec - eg. "DivX Pro 5.0.3 Codec") in the "Choose Videocompressor" window (note that you can select any codec you want here, if you don't want to convert to DivX). Press the "Configure" button, and you should see the window below (slightly modified to make the picture smaller). We'll go through each of the sections, and describe what each setting does. Please refer to the official DivX guide for more detailed and technical information on these feature.
Profiles Setup :
New in version 5.0.3

1. Choose your Profile
DivX 5.0.3 introduces the notion of profiles (or standards). Basically, these are pre-programmed settings for the DivX 5.0.3 codec that conform to standards set by DivX.com. This will be more helpful in the future, when DivX enabled devices are available, and you want to make sure your DivX encodings will playback on these devices.
The four profiles currently available are Handheld, Portable, Home Theatre and High Definition.
2. What is the resolution of your video?
Enter the resolution of your video here and the DivX codec will test and see if this resolution conforms to the profile/standard you have selected.
3. What is the framerate of your video?
Enter the framerate of your video here and the DivX codec will test and see if this framerate conforms to the profile/standard you have selected.
MPEG4 Tools :
These options allows you to select the three special encoding methods that will try to improve the quality of the encoding, while decreasing the file size.
DivX 5.0.3's use of profiles now limits the use of these tools, and you may only be able to select some of these options if you disable the use of profiles.
Use Quarter Pixel - This feature is not working properly in build 413 of the DivX 5.0 codec, so disable it. Not available when profiles are used
Use GMC - Global Motion Compensation (GMC) is useful in improving the quality of scenes where lots of movement (especially panning, zooming) occur. You should enable this option. Not available when profiles are used
Use Bidirectional Encoding - Bidirectional encoding allows for the use of B frames in the encoding, in addition to the I-frame (data for this frame is completely stored) and the P-Frame (predicted frame). This option also increases quality, so enable it as well. Not available for the "Handheld" profile
Bitrate Control Setup :
Variable bitrate Mode
Choose the type of encoding method for this codec. "1-pass" encoding is similar to DivX 3.11 Alpha's "low motion" encoding. "1-pass quality based" encoding is basically constant bitrate encoding (same bitrate used for every frame), and is similar to the compression used in MPEG-1 movies (ie. crappy compression). "2-pass" is the best encoding option (for smallest file size, and best quality) - unfortunately, it takes twice the time of "1-pass" encoding, but the results may be worth it - 2-pass uses the bitrate you selected as appropriately as possible, to give you both an accurate file size (good if you are using bitrate calculators - make sure you get a DivX 4.x/5.0.x compatible calculator) and the best possible looking picture given that bitrate.
New in Version 5.0.3 : DivX 5.0.3 Pro adds Nth pass encoding. Previously, only 2-passes were available. Now, you can have as many passes as you want, with each pass giving the DivX codec more information to work with, and hence, achieve a higher quality encoding (at the expense of time, of course).
Using Nth pass encoding is similar to using 2-pass encoding : you have a common first pass using the "Multipass - 1st pass", and then subsequent passes can be performed using the "Multipass - nth pass" settings.
Max bitrate : - New in Version 5.0.3 (for profile-less "Multipass - nth pass" mode only)
The maximum bit-rate to use during encoding - required by certain DivX/MPEG-4 devices that cannot handle large bit-rates. Max bitrate is not yet implemented in the DivX 5.0.3.
Encoding bitrate :
This is the bit rate setting for the video. A setting of 1500 will produce very good quality video (lower will mean a smaller file size, but poorer quality). Don't go below 650 (650-1000 for 1 CD movies), and there is probably not too much point in going over 2000 (1300-2000 for 2 CDs).
Bitrate modulation : - New in Version 5.0.3 (for "Multipass - nth pass" mode only)
This allows you to tell how much motion your source video has, and let the DivX codec decide on the best way to encode this video source. Drag the slider towards "high-motion" or "low-motion" depending on your source.
Multipass encoding log files :
Log file - 2-pass encoding requires the information in the first pass to be stored in a LOG file - you can specify the location to store the log file by using this option. You can also specify whether to update this log file (the log file only needs to be updated if you plan on doing another pass after the current pass).
MV file - DivX 5.0.x adds MV files, which contains Motion Vector data. Having a MV file will speed up the 2-pass encoding process, as motion compensation is performed during the first pass, and will not need to be done on the second pass again.
MPEG4 Tools :
The MPEG-4 Tools (Quarter Pixel, GMC, Bidirectional Encoding) have been moved to the "Profiles" setup area (see above) in version 5.0.3.
General Parameters Setup :
Enable Crop :
Cropping allows you to remove a part of the picture that you don't want encoded - for example, the black bars on widescreen movies (they will be added back by your DivX player anyway, so there is no point wasting bitrate on them). Generally, your conversion tool will have a similar feature, so you should just disable and ignore this section.
Enable Resize :
Same deal as cropping, except this is for resizing the overall picture - you should just disable and ignore this section.
Psychovisual Enhancement :
Just like how MP3 encoding removes bits that the human ear can't hear, to decrease file size, psychovisual enhancement does the same with the video.
Pre Processing Source :
This option should really be renamed to "Noise Reduction", as this is what it really does. Unless your source has lots of noise in it (which shouldn't be the case if you are converting from a DVD), so you should just disable it.
Keyframe :
Max Keyframe interval - Keyframes helps you to skip forward/backwards (seek) through the movie (when you skip, the picture has to land on a keyframe first). Keyframe are automatically inserted at scene changes, but in case you have a movie where the scene never changes, then set this to a reasonable value to avoid having no keyframes. For example, you can insert a keyframe every 10 seconds by multiplying the framerate of the movie (eg. 23.976 or 25 or 29.97) by 10 (eg. 240, 250, 300), and entering it here.
scene change threshold - Set this to 50%
Performance/quality :
Determines tradeoff between performance and quality. Leaving it as Slowest gives you the best possible picture, and this is what I would set it at, since the speedup in compression is not reason enough to lose all that quality.
Source Interlace :
This option has been drastically changed for version 5.0.3.
You can now encode the video as progressive or interlaced. If your original source is interlaced, then encoding it as interlaced may result in a better looking picture, although it may increase file size. Similarly, encoding the video as progressive if the source is progressive will be benefitial. There are many ways to check if your video source is interlaced or progressive, but using DVD2AVI and checking for the "Frame Type" is a good way to achieve this.
The last option allows you to "Deinterlace all frames", which is just a way to convert the interlaced source into a progressive one. This is not really recommended, as it can lower picture quality.
Advanced Parameters Setup :
No longer available through version 5.0.3's graphical setup - can only be changed via the Windows Registry
Date Rate Control(RC) :
Below are very important settings in determining quality. These settings are now only accessible through the Windows Registry, at the location HKEY_CURRENT_USER\Software\DivXNetworks\DivX4Windows. Do not change these settings unless you know what you are doing, as it can mess up your encoding, or worse, destroy your Windows registry.
Maximum Quantizer - A higher setting (eg. 20) will mean a more compression, hence less picture quality. Lowering the value will increase the file size.
Minimum Quantizer - A lower setting (eg. 2) will mean a more clear picture (less blocky), but will increase the file size.
RC averaging period, frames - This setting determines how the bitrate should be averaged out (eg. if there was a spike in bitrate used in previous frames). Leaving this at 2000 seems to work fine, but experiment by increasing this value, may bring better quality.
RC reaction period, frames - This setting determines how fast the codec should react the scene changes. The default value seems to work fine.
Rate control down/up reaction - The default value also seems to work fine here.
Use data partitioning :
Useful for video streaming, but otherwise, leave it disabled.
Performance/quality :
This setting has been moved to the "General Parameters" setup area (see above) in version 5.0.3.
DivX MP4 Creator :
As mentioned before, MPEG-4 writing does not yet support audio, so ignore this section. No longer available in version 5.0.3
Hier is hij dan eindelijk: de DivX 5.0 Pro handleiding!
Het vervolg op DivX 4.X!
Ik hoop dat je er veel aan hebt. Er is in ieder geval veel tijd in gekropen.
Met eventuele vragen en/of opmerkingen
kan u altijd hier terecht.
Gelieve eventuele spellingsfouten te melden ;-)
1. DivX Decoder
Post Processing:
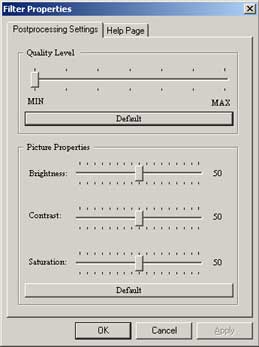
2 soorten filters: horizontale en verticale de-blocking en de-ringing filters.
Post-processing is zeer CPU intensief! Er zijn 7 verschillende niveaus:
minimum (level 0: geen post-processing) tot en met maximum (level 6).
Gebruik het maximum enkel indien je een Pentium III of nieuwere processor
hebt!
| Post processing level |
Horizontal deblocking luminance |
Vertical deblocking luminance |
Horizontal deblocking chrominance |
Vertical deblocking chrominance |
Horizontal deringing |
Vertical deringing |
| 1 |
 |
|
|
|
|
|
| 2 |
|
|
|
|
|
|
| 3 |
|
|
|
|
|
|
| 4 |
|
|
|
|
|
|
| 5 |
|
|
|
|
|
|
| 6 |
|
|
|
|
|
|
|
2. DivX Encoder
a. DivX Codec Hoofdmenu
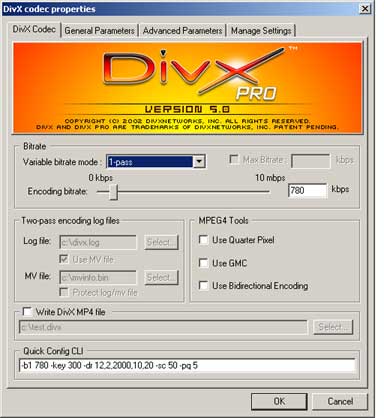
- Bitrate Modes:
- 1-pass (variable bitrate mode):
De encoder zal trachten aan de film een gemiddelde bitrate
toe te kennen ongeveer gelijk aan de opgegeven waarde.
Low-motion scènes zullen minder data krijgen dan
high-motion scènes.
- 1-pass quality based:
De encoder zal elk frame coderen tegen dezelfde absolute
hoeveelheid, zonder rekening te houden met de hoeveelheid
"motion" (beweging).
- 2-pass (variable bitrate mode):
Alvorens werkelijk te coderen, zal de video geanalyseerd
worden op zijn complexiteit, om zo complexere scènes meer
data te geven dan minder complexe scènes. Dit gebeurt
nauwkeuriger dan bij 1-pass encoding. Deze operatie heeft
wel 2 stappen nodig (2-pass): Analyse fase (first pass) en
Codeer fase (second pass).
Tijdens de analyse worden de resultaten in een log file
weggeschreven om nadien tijdens de second pass te gebruiken.
De "Protect Log/My File" optie voorkomt het overschrijven
van een bestaande log file. Dezelfde settings moeten
tijdens beide fases gebruikt worden!
- MPEG4-Tools:
- Bi-directional encoding:
Er bestaan 3 soorten frames in een DivX video stream:
I-frames (Intra), P-frames (Predicted) en B-frames
(Bi-directional). In vorige versies van DivX waren er
enkel I-frames en P-frames.
I-frames worden gecodeerd aan de hand van informatie
binnenin zijn eigen frame. Er wordt geen informatie
gebruikt uit andere frames! Vergelijk het met een enkele
frame waar je gebruik maakt van JPEG-compressie
P-frames worden gecodeerd aan de hand van hun voorgaande
frame. Dikwijls veranderen er maar enkele pixels gedurende
een bepaalde opeenvolging van video frames. In plaats van
elke frame afzonderlijk te coderen zoals een JPEG
afbeelding, wordt er gebruik gemaakt van de "overtollige
informatie": Een P-frame is een toekomstige frame die
detecteert waar een blok in het vorige frame naar toe
verplaatst is in de huidige P-frame. Men geeft dus aan
naar waar een bepaald blok verplaatst is.
DivX 5.0 codec introduceert de mogelijkheid om ook
B-frames te gebruiken. Een B-frame gebruikt niet enkel de
vorige frame om te "voorspellen", maar ook de volgende
frame! Hierdoor is minder data nodig om een frame te
coderen, en de kwaliteit wordt verhoogd!
- Global Motion Compensation (GMC):
GMC helpt complexe scènes, waar "zooming" en "panning"
gebruikt worden, te verbeteren: aangezien opeenvolgende
frames sterk verwant zijn (wegens "zooming" en "panning")
kan men de benodigde data reduceren.
- Quarter Pixel:
De hoeveelheid data wordt gereduceerd door aan te geven
naar waar en bepaald blok verplaatst is, zoals vermeld
hierboven. met andere woorden 2 blokken worden met elkaar
vergeleken en men ziet wat het "verschil" is tussen beiden.
Dit gebeurd normaal aan de hand van een
macroblok-bij-macroblok basis (16x16 pixels) of een
blok-bij-blok basis (8x8 pixels). Om de nauwkeurigheid van
de verplaatsing (verschil) te vergroten maakt DivX gebruik
van een Half Pixel. Dit wil zeggen dat je de verplaatsing
kan uitdrukken met 0.5 pixel in plaats van enkel integer
waarden (verplaatsing met 1 pixel) te gebruiken.
Om nog nauwkeuriger te werken kan je de berekeningen
uitvoeren aan de hand van Quarter Pixels: 0.25 pixel!
- MP4 File Creator:
Deze optie laat je toe een file te maken in het ".divx" formaat
of een MPEG-4 compatibele file. Enkele nieuwe features werken
enkel met het nieuwe ".divx" formaat.
- Quick Config CLI:
Command Line Interface: de geselecteerde opties kan je ook via de
command line ingeven. Tevens krijg je hier te zien wat de command
line parameters zijn voor de gekozen opties, waardoor je makkelijk
instellingen kunt uitwisselen met andere gebruikers (door de
command line te kopiëren).
Meer uitleg vind je in de Appendix over de CLI parameters.
b. General Parameters Menu
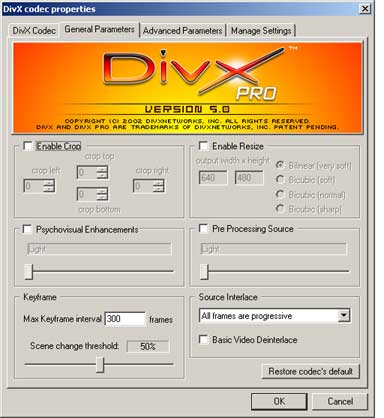
- Enable Crop:
Aan de hand van "cropping" kan je niet gewenste randen verwijderen.
Zo voorkom je dat er nodeloos data aan de niet gewenste randen
gespendeerd wordt.
Specificeer het aantal pixels die aan elke rand moeten weggeknipt
worden.
- Enable Resize:
Resize laat toe de video stream te coderen naar een welbepaalde
resolutie.
Er zijn 4 opties beschikbaar:
- Bilinear (Very Soft):
- Bicubic (Soft)
- Bicubic (Normal)
- Bicubic (Sharp)
Welke optie het best gebruikt wordt is niet helemaal duidelijk.
In de officiële handleiding staat:
"From a mathematical viewpoint, it could be argued that the
bicubic resize algorithm is best for enlarging the image while
bilinear is more suited to size reduction. From our own experience,
the opposite appears to be true."
Ik zelf hou het bij het "wiskundig standpunt", dus gebruik het
bilineaire resize algoritme wanneer je wil verkleinen en het
bicubic resize algoritme wanneer je wil vergroten. Bovendien is
het bilineaire algoritme behoorlijk minder CPU intensief!
Meer uitleg over bilineair vs bicubic vindt u op
Nicky's Pages Digital Solutions.
- Psychovisual Enhancements:
Letterlijk vertaald: psychovisuele verbeteringen.
Door de kennis in verband met de "Human Visual System" (HVS) uit
te buiten is de efficiëntie van video data opslag verbeterd met
als doel de waarneming van kwaliteit in de video te vergroten!
HVS is de manier waarop wij als mens beelden bekijken en
interpreteren.
Met andere woorden: aan de hand van psychovisuele modelleer
technieken wordt er minder data toegekend daar waar ons "Human
Visual System" minder gevoelig is, en meer data daar waar ons HVS
veel gevoeliger is. Belangrijk hierbij is dat er geen rekening
wordt gehouden met één enkel frame, maar wel met een sequentie
van frames! Dit is de sleutel tot data-reductie: we moeten data
toekennen op een manier zoals ons HVS doet bij een video sequentie
aan een welbepaalde frame rate (bv 25 frames per seconde), en NIET
door elk frame afzonderlijk te behandelen!
DivX Pro 5.0 is de eerste wijd verspreidde codec die van deze
innoverende techniek gebruik maakt! Aanvankelijk werd
psychovisueel modelleren bijna uitsluitend gebruikt in academische
onderzoekscentra. Dit is een onderzoeksdomein met nog vele
mogelijkheden!
- Pre-Processing:
Noise (ruis) kan een groot probleem vormen tijdens de video
compressie, omdat de noise relatief veel beschikbare bits (voor
de video stream) in beslag kan nemen.
De pre-processing filter maakt gebruik van digitale signaal
verwerkingstechnieken om noise te verwijderen uit het bronmateriaal, alvorens daadwerkelijk te coderen.
Er wordt gebruik gemaakt van 2 filters. Veronderstel één enkele
pixel ergens in het beeld:
- Spatial Filter:
er wordt gekeken naar de omliggende pixels binnen
hetzelfde frame en op basis hiervan wordt een
"smoothing"-functie (gelijkmaken) toegepast.
- Temporal Filter:
pixels op dezelfde positie over een aantal opeenvolgende
frames worden gelijkgemaakt.
Door deze technieken te gebruiken en zo noise te verminderen
kunnen we in zekere maten de kwaliteit verhogen.
Er zijn 4 opties mogelijk: Light, Normal, Strong en Extreme.
Normal pre-processing zou geen merkbare achteruitgang mogen
veroorzaken van de source file, maar voor een echt gevoelige
source file is er de Light optie. Strong en extreme zullen een
deel van de data verwijderen en kan best gebruikt worden wanneer
file size belangrijker is dan kwaliteit of bij video materiaal
met erg veel ruis.
- Keyframe
De DivX encoder zal, telkens wanneer er een scène verandering
wordt gedetecteerd, automatisch een keyframe invoeren. Wanneer er
echter gedurende een relatief lange tijd geen scène overgang
gedetecteerd wordt zal de encoder automatisch keyframes toevoegen
met een frequentie gespecificeerd door de gebruiker. Aangezien
keyframes het "grootst" zijn van alle frames zal de frequentie een
drastisch effect hebben op de uiteindelijke gecodeerde file grootte!
Aangeraden wordt minstens elke 10 seconden een keyframe in te
voegen, dus wanneer je een frame rate hebt van 25 fps betekent dit
om de 250 frames!
- Intelligent De-Interlace/Inverse Telecine (Source Interlace):
Interlacing is uitgevonden in de jaren '40: in plaats van elke
seconde 60 frames te zenden worden er afwisselend even en oneven
"lijnen" verzonden (film is opgebouwd uit lijnen). Een interlaced
scherm zal deze lijnen vervolgens "interlacen" (ineenvoegen) op
een correcte manier.
Een camera zal bv 1/60 van een seconde een oneven lijn opnemen,
en de volgende 1/60 seconde een even lijn. Dit kan bij snel
bewegende objecten gekartelde randen geven tijdens het afspelen.
Het is mogelijk deze gekartelde (scherpe) randen weg te krijgen
aan de hand van de-interlacing. De DivX codec kan, alvorens te
coderen, de source file de-interlacen. Belangrijk hierbij is wel
dat de video niet geresized wordt door een extern programma!
Een film wordt meestal gemaakt aan 24 fps, terwijl de NTSC
standaard 30 fps bedraagt. De film wordt daarom geconverteerd naar
30 fps door sommige video velden te dupliceren (telecine genaamd).
Hierdoor bekomt men de gewenste 30 fps. Inverse-Telecine (IVTC) is
het omgekeerde van wat hier boven staat: de gedupliceerde velden
worden terug verwijderd!
De DivX codec heeft 3 opties voor de-interlacing en IVTC:
- All frames are progressive:
default optie: de-interlacing en IVTC worden niet
gebruikt!
- All frames are interlaced:
de codec zal alvorens te resizen en coderen een
de-interlace algoritme uitvoeren.
- Intelligent IVTC/de-interlace:
de codec zal automatisch uitzoeken wanneer IVTC en
de-interlacing gebruikt moet worden.
Er is ook nog een optie beschikbaar voor gebruikers wiens
hoofdzorg de codeer snelheid is: "Basic Video Deinterlace". Deze
optie mag niet gebruikt worden wanneer er ook aan "resizing" wordt
gedaan! Verder moet de Source Interlace optie op "All frames are
progressive" staan.
c. Advanced Parameters Menu
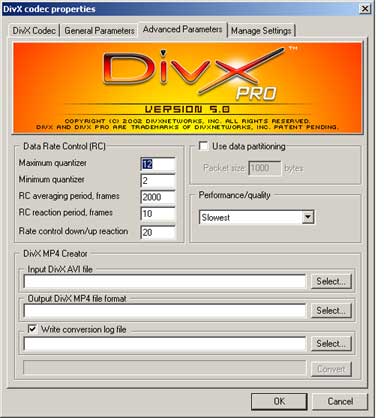
- Data Rate Control Parameters (RC):
Met een aantal opties kan je experimenteren, maar hou er rekening
mee dat kleine veranderingen merkbare effecten tot gevolg kunnen
hebben! Daarom zijn deze features bedoeld voor ervaren gebruikers:
zelfs de ontwikkelaars begrijpen niet 100% hoe elke parameter
juist werkt!
- Maximum and Minimum Quantizers:
De quantizer is één van de belangrijkste parameters
tijdens het coderen! De quantizer bepaalt hoe mooi de
encoder de video sequentie codeert. De algemene regel is:
lage quantizer waarde = beter kwaliteit + grotere file!
De default waarden zouden min of meer een optimaal
resultaat moeten geven.
Als je toch wil experimenteren, hou dan rekening met het
volgende:
Wanneer je een low-motion scène hebt gecodeerd en je bent
niet helemaal tevreden over het resultaat probeer dan de
Minimum Quantizer waarde te verlagen. Merk wel op dat je
uiteindelijke file grootte hierdoor zal toenemen.
Wanneer je een high-motion scène hebt gecodeerd en je bent
niet helemaal tevreden over het resultaat probeer dan de
Maximum Quantizer waarde te verlagen. Merk ook hier op dat
je uiteindelijke file grootte hierdoor zal toenemen.
Om de juiste settings te vinden kan je als volgt te werk
gaan: zet de quantizer waarden tamelijk hoog en codeer
een high-motion scene van 30 Ã 60 sec. Bekijk nu dit
fragment en verlaag de maximum-quantizer waarde totdat het
blokeffect niet of weinig meer voorkomt. Doe nu hetzelfde
met een low-motion scene (bv waar mensen enkel aan het
spreken zijn met elkaar). Bekijk het resultaat en verlaag
de minimum-quantizer waarde totdat het blokeffect (zo goed
als) verdwenen is.
- RC Averaging Period, frames:
Controleert hoeveel frames er gebruikt moeten worden bij
het bepalen hoe de bitrate verdeeld moet worden. De
default waarde zou normaal goed moeten werken!
- RC Reaction Period, frames:
Regelt de balans tussen low-motion en high-motion scenes.
Hogere waarden resulteren meestal in betere high-motion
scenes en slechtere low-motion scenes. De default waarde
zou normaal goed moeten werken.
- Rate Control Down/Up Reaction:
Deze optie controleert de gevoeligheid waarmee bepaald
wordt met welke motion (bewegingsgraad) we te maken
hebben: high-motion of low-motion. Hoe hoger het nummer,
hoe gevoeliger de codec wordt voor beweging. Hogere
waarden zorgen meestal voor betere high-motion scènes,
maar ook voor extra benodigde bits! De default waarde zou
normaal goed moeten werken.
Al deze parameters staan in relatie met elkaar! Het effect
van een bepaalde optie hangt vaak af van de andere parameters!
- Data Partitioning:
Data Partitioning kan nuttig zijn wanneer transmissie errors
kunnen voorkomen zoals in broadcast omgevingen. Data Partitioning
zal de data in de stream op een andere manier organizeren zodanig
dat men aan "error recovery" en "packet re-synchronization" kan doen.
- Performance/Quality:
De kern van de zaak is:
wanneer een betere kwaliteit verlangd wordt, heb je meer CPU tijd nodig!
Je zal zelden of nooit de Quality optie op iets anders dan "slowest"
moeten zetten, aangezien dit de BESTE kwaliteit geeft! Laat deze
optie op "slowest" staan tenzij noodzakelijk van niet!
- DivX MP4 Creator:
Hiermee kan je een DivX avi file (of DivX file) converteren naar
een DivX MP4 file.
DivX 5.0 CLI Parameters
That 's it!
Ik hoop dat ik je heb kunnen helpen!
Greetz,
Diederik
|