Cutting AVI Files
Original Page URL: http://www.divx-digest.com/articles/cutavi.html
Author/Publisher: Digital Digest
Date Added: Jun 28, 2001
Date Updated: Jun 28, 2001
Cutting AVI files is actually quite an easy thing to do, if you know which software to use. Although there are many generic file cutting tools available, the problem with them is that they don't "understand" the AVI format, and the files that are cut with them will most likely have problems.
However, using an AVI editing tool to cut AVIs, will almost always yield good results. There are many AVI editors around, but for this tutorial, we'll use VirtualDub, a freeware open-source AVI editor, popular amongst the DivX community.
What VirtualDub does isn't strictly cutting, but what it does is allow you to select a part of the movie, save it as another AVI file (no re-compression needed, so it will only take a few seconds to save the AVI file), and repeat this process until all your AVI cut is completed.
We hope you enjoy this guide.
You'll need to download and install the following software before you proceed with the rest of this guide.
VirtualDub - an AVI editor
- Start VirtualDub and load in your AVI file (from the "File" menu).
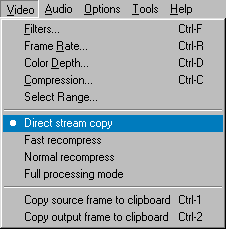
- From the "Video" menu, select "Direct Stream Copy".
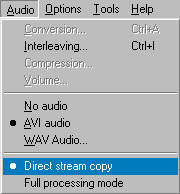
- From the "Audio" menu, select "Direct Stream Copy".
- Let's also get familiar with VirtualDub's controls

- Slider - Can be used to slide to parts of the movie
- Move to last frame - Pressing this button will move the slider to the end of the movie
- Keyframe previous - Skip to the previous keyframe
- Keyframe next - Skip to the next keyframe
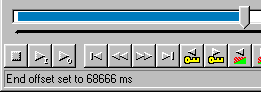
- Mark in - Marks a position that tells VirtualDub where to start the cut
- Mark out - Marks a position that tells VirtualDub where to end the cut
- Current Slider position - Tells you where the slider is currently positioned at
- First, press the Move to last frame button to move the slider to the end of the movie. Take a note of the Current Slider position, especially the Frame number. This is the total number of frames. Example : total number of frames is 2387
- Decide how many parts you want to cut the movie, and divide the total number of frames by the number of parts you want to cut - this is the number of frames for each part. Example : number of parts you want to cut is 4. If total number of frames is 2387, then each part will be 596 frames.
- Slide the slider back to the beginning of the movie.
- Press the Mark in button.
- Slide the slider to where you want to stop cutting. Example : move the slider to frame 596 x 1 = 596 (or roughly there).
- Press the Keyframe previous or Keyframe next button once to skip to the next keyframe (it is good to cut at a keyframe, to avoid problems).
- Now press the Mark out button. Note that part of the slider bar will now have been highlighted - the highlighted part is the part you are cutting.
- From the "File" menu, select "Save as AVI" and save the file as a new AVI (don't overwrite your existing files). Example : save the AVI as movie-1.avi
- Press the Mark in button.
- Slide the slider to where you want to stop cutting. Example : move the slider to 596 x 2 = 1192 (or roughly there).
- Press the Keyframe previous or Keyframe next button once to skip to the next keyframe (it is good to cut at a keyframe, to avoid problems).
- Now press the Mark out button. Note that part of the slider bar will now have been highlighted - the highlighted part is the part you are cutting.
- From the "File" menu, select "Save as AVI" and save the file as a new AVI (don't overwrite your existing files). Example : save the AVI as movie-2.avi
- Repeat step 13 through 17 until you are near the end of the movie - if you are near the end of the movie, press the Move to last frame button to cut the last part of the movie.
- Please note that you should have several new AVI files, but your original AVI file should still be there (you can delete it if you don't need it anymore).
The primary reason for audio synch problems is that audio interleaving option in VirtualDub's "Audio" menu. You should uncheck the "Enable audio/video interleaving" option and make sure the audio track delay setting is at 0. Also, it is wise to cut on keyframes to avoid similar audio problems.
假如你懂得使用適合的軟體, 切割 AVI 文檔其實是很簡單的事情.
儘管可以很容易得到一些通用的文檔切割工具, 但它們一般都不懂AVI 文檔的格式, 所以它們切割出來的AVI
文檔都會有各種各樣的問題出現.
如果用一個AVI 編輯軟體來分割AVI 文檔一般都會得到令人滿意的效果.
儘管AVI 的編輯軟體有很多, 但在這一篇指引中我們以 VirtualDub 作例子, 因為它是一個免費的開放原碼軟體,
而且最流行的一個文件
VirtualDub 不是死板地把文檔分割開來,
它是讓你選擇你需要的部分, 然後把它存為一個新的AVI 文檔. (因為不需要重新壓縮,
全過程只需要幾秒鐘)
我們希望你會喜歡這一編指引
在你開始閱讀這篇指引以前你需要下載並安裝下列軟體
VirtualDub - 一個AVI 編輯軟體
- 運行VirtualDub 並打開你的AVI 文檔 (Ctrl+O) 例如 Movie.avi
- 在Video 功能表(Alt+V)上選擇直接流式複製 "Direct Stream Copy"

- 在Audio 功能表(Alt+A)上同樣選擇"Direct Stream Copy".

- 先熟悉一下VirtualDub 的操作:

- Slider 滑行條 - 可以用來移動到電影的不同部分
- Move to last frame 跳到最後一幀- 把滑行條移到電影的最後一個影格
- Keyframe previous 前一關鍵幀
- 跳到前一個關鍵影格
- Keyframe next 下一關鍵幀 - 跳到下一個關鍵影格
- Mark in 開始界限 - 標記修改部分的開端
- Mark out 結束界限 -標記修改部分的末端
- Current Slider position 滑行條的位置 -
告訴你滑行條所在的影格
- 首先跳到最後一幀, 記下滑行條的位置 (這就是總影格數). 例如 2387.
把總影格數除以需要切割的份數就可以得到每份的影格數. 例如2387 分4 份, 那麼每份是 596
個影格.
- 跳到電影的第一個影格, 按 "Mark in" 設定修改部分的開端.
- 然後可以用滑行條移動到第596 幀左右, 或者用(Ctrl+G) 選擇Jump to frame number
596. 再用Keyframe previous 或Keyframe next找到上一或者下一個關鍵幀
(從關鍵影格進行分割可以減少出現問題的機會), 記下這個影格號,
因為這也是電影下一部分的開端.
最後就是用 Mark out 來設定修改部分的末端.
注意你選擇了的部分會用藍色在滑動條上表示出來.

- 在文檔功能表上(Alt+F) 選擇"Save as AVI" 然後把它儲存下來(記住不要覆蓋原來的 文檔) 例如
Movie-1.avi
- 然後重複剛才的步驟, 只是把Mark in 設置到剛才Mark out 的地方, Mark out
就設置到相應的地方. 例如 596 x 2 = 1192, 就把Mark out設在最接近1192的關鍵影格處.
再儲存成一個新的文檔, 例如 Movie-2.avi
- 當所有需要切割的部分都保存了以後才可以刪除原來的AVI 文檔.
The primary reason for audio synch problems is that audio interleaving option in VirtualDub's "Audio" menu. You should uncheck the "Enable audio/video interleaving" option and make sure the audio track delay setting is at 0. Also, it is wise to cut on keyframes to avoid similar audio problems.
Translated by iCy-fLaME
Dividere file AVI attualmente è davvero una cosa facile da fare, se sai che software usare. Sebbene ci siano molti programmi "cutting" disponibili, il problema è che loro non "capiscono" il formato AVI, e i files che sono stati tagliati con loro, probabilmente potrebbero avere dei problemi.Comunque, usando un qualsiasi programma di editing AVI in giro per la rete per dividerli, quasi sempre produrrà esiti positivi. Ci sono molti programmi in giro per gli AVI, ma per questa guida, useremo VirtualDub, un programma freeware per aprire sorgenti AVI, popolare fra la comunità DivX.Quello che VirtualDub fa non è tagliare drasticamente, ma permettere di selezionare una parte del film, e salvarlo come un altro file AVI (non ha bisogno di nessuna ricompressione così richiederà solamente pochi secondi per salvare il file AVI). Ripetete questo processo fino a che tutto il tuo AVI diviso sia completato. Speriamo che tu gradirai questa guida.
We hope you enjoy this guide.
Tu avrai bisogno di scaricare e installare il seguente software prima di procedere col resto di questa guida.
VirtualDub - un editor AVI
- Avvia VirtualDub e carica il tuo file AVI (dal menu "File").
- Dal menu "Video", seleziona "Direct Stream Copy".

- Dal menu "Audio", seleziona "Direct Stream Copy".

- Adesso prendiamo familiarità con i comandi di VirtualDub

- Slider - può essere usato per posizionarsi alle parti del filmato
- Move to last frame - Premendo questo tasto ci si sposterà alla fine del filmato
- Keyframe previous - Salto al fotogramma chiave precedente
- Keyframe next - Salto al prossimo fotogramma chiave
- Marchi in - "Setti" la posizione che dice a Virtualdub dove cominciare a tagliare
- Marchi out - "Setti" la posizione che dice a Virtualdub dove finire di tagliare
- Current Slider position - Indica dove il puntatore del filmato è attualmente posizionato
- Prima di tutto, premi il tasto Move to last frame per trasportare il puntatore alla fine del filmato. Prendi nota della posizione corrente del puntatore, specialmente il numero del frame. Questo è il numero totale di frames. Esempio: Il numero totale di frames è 2387
- Decidi in quante parti vuoi tagliare il film, e dividi il numero totale di frames dal numero di parti che tu vuoi creare tagliando - questo è il numero di frames per ciascuna parte. Esempio: il numero di parti che tu vuoi tagliare è 4. Se il numero totale di frames è 2387, vorrà dire che ciascuna parte sarà composta da 596 frames.
- Porta il puntatore indietro fino all'inizio del film.
- Premi il tasto Marchi in
- Porta il puntatore fino a dove vuoi fermarti a tagliare. Esempio: trasporta il puntatore fino al frame 596 x 1 = 596 (o via di lì).
- Premi il tasto Keyframe previous o il tasto Keyframe next una volta volta per saltare al fotogramma chiave successivo (è buono per tagliare un fotogramma chiave, ed evitare problemi).
- Ora premi il tasto Marchi out. Fai attenzione a quella parte della barra del puntatore che ora sarà stata evidenziata - la parte evidenziata è la parte che tu stai tagliando.

- Dal menu "File", seleziona "Save as AVI" e salva il file come un AVI nuovo (non riscrivere sopra i file gia' esistenti). Esempio: salva l'AVI come movie-1.avi
- Premi il tasto Marchi in.
- Porta il puntatore fino a dove vuoi fermarti a tagliare. Esempio: trasporta il puntatore a 596 x 2 = 1192 (o via di lì).
- Premi il tasto Keyframe previous o il tasto Keyframe next una volta per saltare al fotogramma chiave successivo (è buono per tagliare un fotogramma chiave, evitando problemi).
- Ora Premi il tasto Marchi out. Fai attenzione a quella parte della sbarra delpuntatore che ora sarà stata evidenziata - la parte evidenziata è la parte che tu stai tagliando.
- Dal menu "File", seleziona "Save as AVI" e salva il file come un AVI nuovo (non riscrivere sopra i file gia' esistenti). Esempio: salva l'AVI come movie-2.avi
- Ripeti dal punto 13 al punto 17 finché non sei vicino alla fine del filmato - se sei vicino alla fine del filmato, premi il tasto Move to last frame per tagliare l'ultima parte del film.
- Per favore fai attenzione, dovresti avere diversi file AVI nuovi, ma il file AVI originale ancora dovrebbe essere là (puoi cancellarlo se non ne hai piu' bisogno).
The primary reason for audio synch problems is that audio interleaving option in VirtualDub's "Audio" menu. You should uncheck the "Enable audio/video interleaving" option and make sure the audio track delay setting is at 0. Also, it is wise to cut on keyframes to avoid similar audio problems.
Translated by Enzo Di Dedda
|