How to burn Dual
Layer Disks with PgcEdit
By blutach
From version 0.6.0 on, PgcEdit has had the ability to burn dual layer disks, enabling you to set the layer break where you want.
Software required:
PgcEdit – Get it here
- ImgBurn – click on the button in the burn setup dialogue to download
- mkisofs.exe – click on the button in the burn setup dialogue – either use the one bundled with PgcEdit (faster and recommended) or click the button to download ImgTool Classic (make sure you get Classic and not ImgTool Burn)
- Daemon Tools – click on the button in the burn setup dialogue to download (Optional, if you wish to mount your ISO as a virtual DVD drive)
Burn Method:
1. Open PgcEdit and open the project by browsing to the folder containing your DVD files.
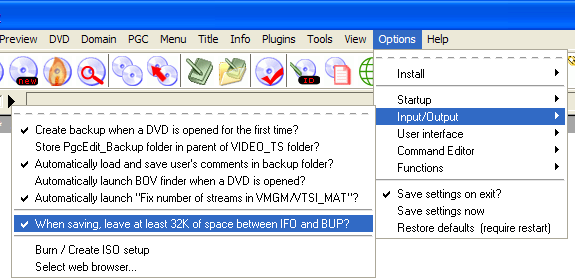
2. Make sure the option “When saving, leave at least 32K of space between IFO and BUP” is ticked. See here for why.
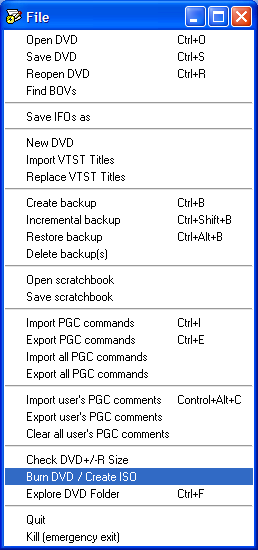
3. To burn your DVD, click on File – Burn DVD / Create ISO (or just click on the “burn” icon on the toolbar). PgcEdit will automatically save your DVD and, if your files are not already in the VIDEO_TS folder, PgcEdit will offer to put them there and create the file structure automatically for you. This minimises the chance of a bad burn because of lack of these folders.
There is a one-time setup of your program locations, burner drive letter and media size.
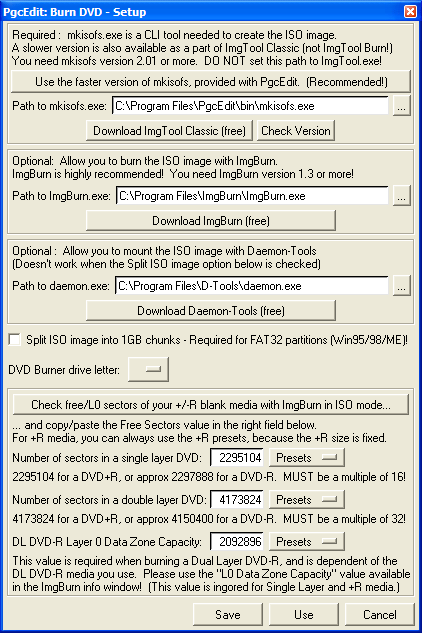
(a) Download the various programs if necessary.
(b) Set the paths to where you have installed mkisofs, ImgBurn and Daemon Tools (if you wish). To do this click on the … to the right of the dialogue box and navigate to the folder where you have installed the various programs. If you use the mkisofs version bundled with PgcEdit it will be in the bin sub-folder of the PgcEdit folder.
(c) If you are on a Win 95/98/ME system, tick the Split ISO image into 1Gb chunks box.
(d) Set your DVD burner’s drive letter.
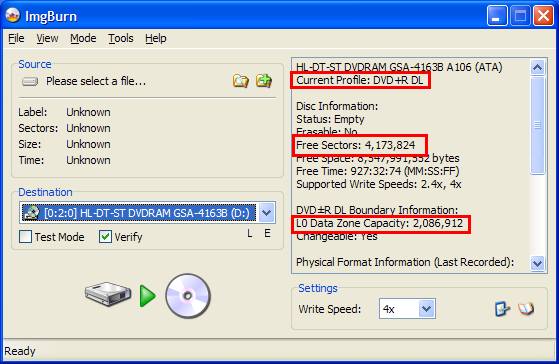
(e) Now set the number of sectors in the media you are using – there are a number of preset defaults for both -R and +R media. You may use these safely, however, if you wish to be more accurate, you may insert a blank DVD into your drive and click on Check free/L0 sectors of your +/-R blank media with ImgBurn in ISO mode… and examine the sector information in the top right info screen. If it differs, enter that information instead.
Note the DVD-R layer 0 data zone capacity is absolutely required for –R DL disks (but is ignored for +R DVDs). Note this number may vary for different MID codes of –R DL DVDs. If you must use –Rs, check these numbers every time you buy a new set of blanks.
(f) When you have finished, Save your settings.
(g) If you want to use a media with different capacity for just this burn click Use. Your saved presets won’t be affected but this burn will use the current data.
Pressing save or use will bring up the main burn screen.
Notice the handy information dialogue at the top of the screen (you may also access the setup dialogue by clicking on Setup).
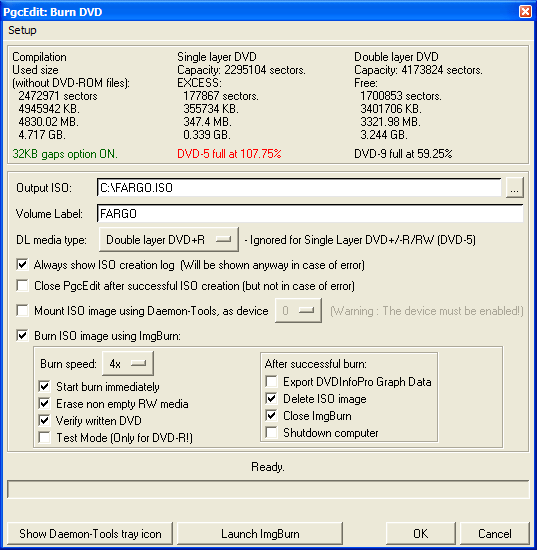
Tick the appropriate boxes (I always use verify unless I’m doing a test with an RW) and select a burn speed that suits your disk and burner.
Give the output ISO file a name – anything will do so long as it ends in .ISO and pick a convenient location to save it. The easy way is just to click on the 3 dots to the right and you can generate the ISO where you like (The desktop is probably the most convenient place).
Tip: If you have 2 hard drives, saving the ISO (which is temporary and will be deleted pretty soon) on the other IDE channel will speed up its creation a lot.
Now, fill in the volume name (this is the name of the movie). Don’t forget those underlines and make sure they are all UPPER CASE. PgcEdit will automatically suggest a name for you from the name of your parent folder.
Tip: If you have filled in the name of the disk under DVD – Set DVD-Text General Name, the above boxes will be displayed automatically, which is very handy.
Click OK.
STEP 6 – SETTING THE LAYER BREAK
If you have a DVD that will fit in a single layer, this step will be skipped and you will be directed to step 7, where the ISO is created.
Otherwise the layer break dialogue box will appear and you can set your layer break.
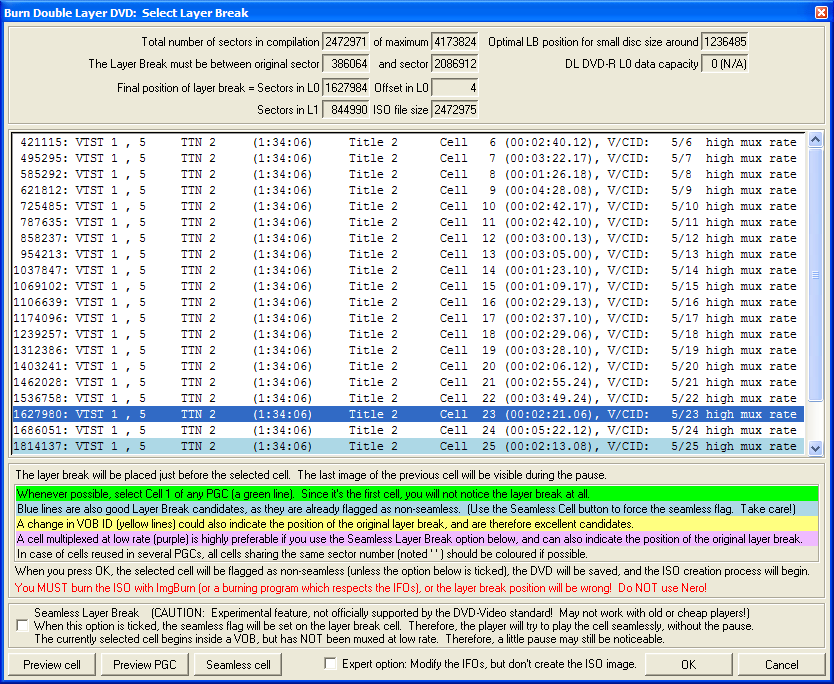
Sometimes, as in this example, you have lots of choice (because there is not too much data on the disk). Other times, there may only be one or two cells that are appropriate.
This dialogue shows:
Where each cell starts in terms of sectors
the PGC number (VTST 1, 5)
the title number in the video titleset (TTN 2)
the time of the title (1 hour, 34 minutes, 6 seconds)
the title number identified in the video manager (Title 2)
the various cell numbers, their playing times and their Vob/Cell ID numbers
the mux rate at the cell change (high or low). More on this later.
At the top, there is information about the size of the ISO and the position of the layer break. The final position of the layer break is computed as the raw position of the cell plus the L0 offset. The ISO size is the number of sectors in the compilation (i.e. in the DVD) plus the offset. The number of sectors to burn will be twice the layer break sector (and will always be higher than the ISO size), since ImgBurn pads out the remainder of layer 1.
PgcEdit also gives you advice on the optimal position for the layer break in terms of balancing the data between layer 1 and 2 (top right). In this case, it suggests sector 1,236,485 – the closest cell to this being cell 18. Choosing cell 18 will write as much data on the inside of the disk as possible as lessen the chance of data corruption near the outside of the disk. However, this computation does not take into account whether this would be an appropriate time in the movie to have a layer break “pause” while the laser focuses on layer 1. You can preview a cell to see whether it is a good place to put the LB by clicking Preview cell (do this by previewing the end of the previous cell, since this is where the LB is being placed).
Note the text at the bottom of the window. Read it carefully!
The layer break will be set just before your chosen cell starts
The cells highlighted in green (if any) are the best choice as they are entry cells and if you place the layer break there, it will not be noticed at all
The cells highlighted in blue are already marked as layer break cells (in the above example cell 25) and in the absence of a green cell, is probably the best choice (this is where the highlight will be placed on entry to the dialogue box)
A cell highlighted in yellow is a change in VOBID and is also a good candidate for the layer break (this will often already be set as the layer break and be highlighted in blue).
A cell highlighted in purple is multiplexed (muxed) at a low rate, often in anticipation of a layer break (see below) and is also a good place to break.
If you change the layer break from a blue marked cell, the new layer break cell is set as non-seamless. In this case, set the old blue cell to seamless by clicking on seamless cell
You can preview the cells by placing the cursor on a particular cell and clicking Preview cell. Cells which start off with a second or so of blackness are often good candidates for a layer break.
When you are done, click on OK.
PgcEdit will set the layer break and automatically write the correct sector to ImgBurn’s settings and will display a message asking if you want to copy the number to the clipboard (which is not necessary if you have ticked Burn ISO image with ImgBurn – see step 5). Clicking Yes or No will begin the ISO creation process.
Seamless layer break and the mux rate
After much research (see here and especially mpucoder’s comments at post 69), PgcEdit has implemented an experimental feature. Use this at your own risk and read carefully the caution after Seamless Layer Break down the bottom.
Selecting this option removes the “layer break flag” and marks the cell to be seamlessly played back (without pause).
Essentially, it is lower risk to use this option if the cell is muxed at a “low mux rate” (purple highlight). If it is not, the player may not have sufficient time to refocus the laser on layer 1 and you may have made a coaster.
A note on DVD’s with re-used cells
If there are reused cells, the dialogue will show them interleaved with the original ones. In this case, selecting any PGC cell is equivalent, and all the PGC cells using the same VOB cell will be flagged as non-seamless.
For example:
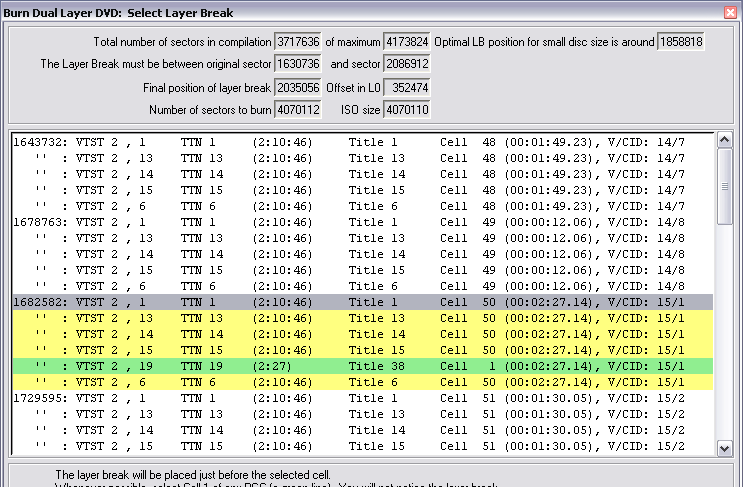
Here Vob/Cell ID 15/1 is selected as the layer break cell. It is the 50th cell in Titles 1, 13, 14, 15 and 6 (which are all main movie length) and is the first cell in title 38 (a short extra). As it represents a change in Vob ID (the previous cell had Vob ID of 14), it is coloured yellow and highlighted as a good place for the layer break. For Title 38, however, it is the entry cell, and is therefore green and will not even be noticed as that title plays.
STEP 7 – CREATING THE ISO / BURNING
The ISO creation starts (it will take about 4-8 minutes depending on the size of your files). Once finished, PgcEdit will display the following screen:

PgcEdit works by following the rules of dual layer burning (layer 0 must have more data than layer 1 and the layer break must be on an error correction boundary, where the LB sector is divisible by 16).
Notice the following:
The layer break is where we selected – cell 18 (I took PgcEdit’s advice and burned the DVD at the “optimal” LB postion)
The size of the ISO is 2,472,978 “extents” (sectors) and the data on layer 0 is 1,239,264 (which is more than half the data and therefore follows the rules). This number is parsed automatically to ImgBurn for it to burn the DVD correctly.
The “pad” was 7 for VIDEO_TS.VOB. This is the same as the offset in L0 in the layer break dialogue (as it should be). PgcEdit has inserted 7 dummy sectors between the end of VIDEO_TS.VOB and its VIDEO_TS.BUP to ensure L0 ends at an error correction boundary (which it does since 1,239,264 is evenly divisible by 16).
Note: In the event that 32k gaps are needed to pad out other VTSs (that don’t contain the layer break), these additions will be slightly different. This is not a cause for concern.
The message that the ISO was created OK means you’re good to go and PgcEdit will launch ImgBurn to burn (and verify your burn if you have selected that option – always a good idea). If there was an error creating the ISO, the process will stop and you will NOT make a coaster.
OTHER THINGS TO CONSIDER, ACKNOWLEDGEMENTS ETC.
If the Layer Break dialogue screen doesn’t open (see step 6), your disk is either small enough to fit on a DVD-5 or the disk’s authoring is such that it has no cells within range of the layer break. In the latter case, an error message will be displayed and you will need to re-author the disk.
A point on media – it is highly recommended to burn on DL +R media. The issue is that –R media is not compatible with the standard method of setting a layer break. A –R DL always burns to the end of L0 and breaks there. If you must use –R media, you must complete the dialogue box accurately in step 4 and use ImgBurn to burn. Even then, you’re chances are problematic. Use high quality, +R media – Verbatim is highly recommended (Ridata and RICOHJPN are not recommended).
If you don’t burn with ImgBurn, you will need to find a burning program that respects the position of the layer break, enables you to input the manual layer break you have chosen and be able to fill layer 1 with padding sectors at the end. GEAR (which is available on all platforms) may qualify (untested). Nero does not.
That’s it!
Questions should be directed to the doom9 forum here.
Happy and successful dual layer burning with PgcEdit!
Version 2
24 June
2006