Using VirtualDub - Re-encode AVI for standalone compatibilityOriginal Page URL: http://www.digital-digest.com/dvd/articles/article_virtualdub_standalone_page1.htmlAuthor/Publisher: jmet Date Added: Jan 2, 2006 Date Updated: Jan 2, 2006 Software you will need:
Introduction: Many DVD players are now capable of playing AVI (MPEG-4/DivX/XviD) files. Unfortunately, not all AVI files are compatible with stand alone players. This guide will teach you how to re-encode AVI files so that you can make sure they will have maximum compatibility with stand alone players (although absolute compatibility is hard to ensure). Now because DVD players are different, and newer models will play more types of MPEG-4 files, this guide should only be used if you know that your AVI file isn't standalone compatible (and preferably if you know what types of AVI/MPEG-4 files your DVD player will play). It is very important that you check your DVD player's documentations or their official website to see if they have any information on AVI/MPEG-4 compatibility (eg. for my DVD player, the information can be found on the official website). This guides goes through some of the common problems you might have in regards to compatibility (see the first section "Reasons for Incompatibility"). Just a note though, when re-encoding, your output will always lose some type of quality compared to the source, whether it be noticeable or not. Your never going to improve quality by encoding with a different codec. The re-encoding instructions in this guide is designed for speed and quality will suffer as a result. Also, if you want a simple point and click type experience, you can use AutoGK using the instructions listed here (AutoGK Step 1 onwards). You will still need to note what is required for compatibility with your DVD player, and if you don't have access to this information, then you should take note of the "Reasons for Incompatibility" section below in regards to the common requirements to ensure maximum compatibility. Note: The original method outlined in this guide can be found in this article. Some additions are also based on some excellent suggestions provided by UncasMS. Reasons for Incompatibility: As mentioned above, your standalone player will have different criteria to ensure compatibility, but here are some commonly found reasons for incompatibility:
First up, we need to find some information about the AVI file, to ensure that you either match the size of the original file, or to see if the original file's bitrate is too high (see "Reasons for Incompatibility" above). We'll use GSpot, as it give you most of the information you'll need later on. Load the avi file you wish to re-encode into GSpot and write down (or do a screen capture, if you are capable):
The reason you need all of this information is to use it later in a bitrate calculator to set the size of the re-encoded AVI file (eg. if you need the file to fit onto a CD). In actual fact, you can simply enter the "the original bitrate" listed in GSpot into the DivX/XviD codec, and you should get roughly the same sized file, but it won't be as precise as using the built in calculators for the codecs. After you have gotten it all down, you can close GSpot. (Screen Shot Below) 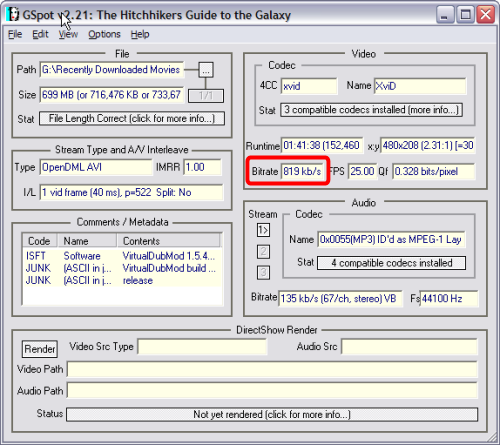 Now start up VirtualDub and load the avi file you wish to re-encode. Select the "Audio" drop down menu at the top (red). Ensure "Source audio" (blue) and "Direct stream copy" (green) are selected. "Source audio" should be selected by default, and it simply means that VirtualDub will use the audio that was found within the loaded AVI file (as opposed to "No Audio", which uses no audio for the output, and "WAV audio", which allows you to replace the current audio with the audio in a WAV file). "Direct stream copy" (like the video equivalent) simply means that no processing will be done on the audio, and it will be copied over bit for bit from the loaded AVI file, maintaining the original quality and will be very quick. (Screen Shot Below) 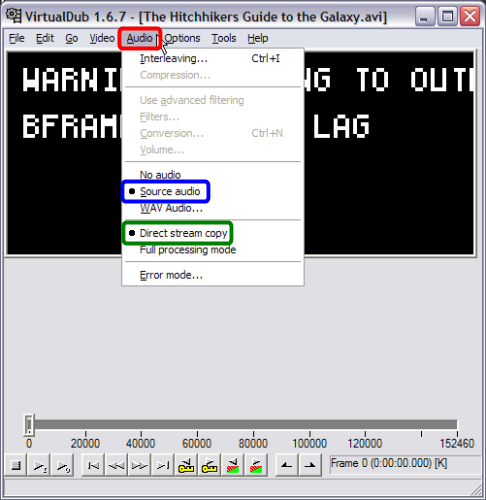 Now click "Video" at the top and then click "Fast recompress" (red). (Screen Shot Below)
 Now click "Video" at the top again and click on "Compression" (red). (Screen Shot Below) 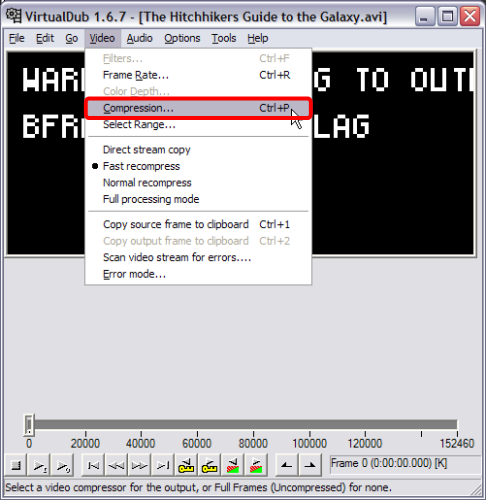 After clicking "Compression...", you will now have to choose which codec you want to use. Either XviD or DivX. First I will show you the DivX method below, then on the next page I'll show you XviD method. You can skip to the XviD method here.
Using the DivX codec: On this screen, select the DivX codec (red) , then click the "Configure" button (blue). (Screen Shot Below) 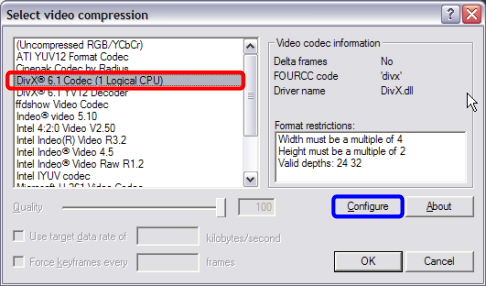 After clicking the "Configure" button, this screen will come up. As mentione earlier, you can enter in the original bitrate you wrote down in the first step in the "Bitrate box", mine was "819kb/s", so thats what I put there (red). Or if you want something more precise, you can use the built in bitrate calculator by pressing the button with the picture of a calculator on it. Here, you'll need to enter some of the other information we took down from GSpot, such as the duration, the audio bitrate, FPS and also the file size you want to achieve (either match the original file's file size). Once you enter all of the information, the bitrate you need is calculated for you and the bitrate is automatically adjusted for you as well when you press "Accept". (Screen Shot Below)  One thing to note here is that to ensure maximum compatibility, try to make sure the bitrate isn't too high, as you may risk problems with skipping. The range of acceptable bitrate will vary from player to player (so check your player's manuals for more information). For my DVD player, it is below 1500 kbit/s for files burned on CDs and 3000 kbit/s for files burned onto DVDs. Now, make sure "1-pass" encoding is selected. Also make sure it says "Home Theater Profile" in the "Certification Profile" box (blue). Then click the "OK" button after you have completed the above (green). Then click "OK" on the "Codec" screen after that. (Screen Shot Below) 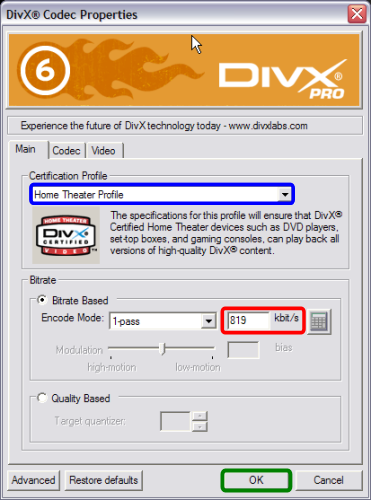 For a more detailed explanation of profiles, and other DivX codec settings, please refer to this guide. Using the XviD codec:
Select the XviD codec (red). Sometimes you have more than on XviD listed (one with "FOURCC Code" "xvid" and another with "yv12") - in this case, choose the one that has the "FOURCC Code" "xvid" (blue). Click on Configure (green) to continue. (Screen Shot Below) 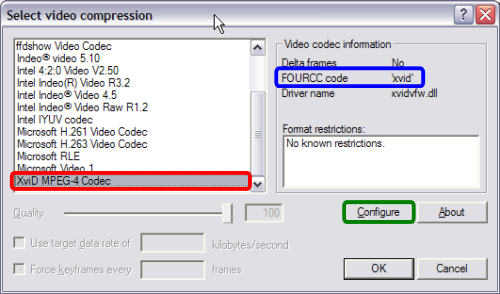 After clicking on the "Configure" button, this screen will come up. There are several things we need to check/change here so I will refer to them by color. The color corresponds to the color box on the screen shot. Do them in the order I list below. (Some might already be set to what they are suppose to be though.). For a more detailed explanation of profiles, and other XviD codec settings, please refer to this guide. Red - 1. Click the down arrow and select "AS @ L5" for the profile @ level. "AS" stands for "Advanced Simple". As mentioned above many DVD players only support "Simple" or "Advanced Simple" profiles, and without QPEL/GMC support. Blue - 2. "single pass" is the fastest, but won't give you the best quality. "Twopass" will take approximately double the time of a "single pass", but the quality will improve. For this guide, we'll select "single pass". Green - 3. Click this button until it says "Target bitrate (kbps)" on the button Gold - 4. Enter in the bitrate number you wrote down from GSpot in the first step or for something more precise, click on the "calc" button next to it to open up the XviD bitrate calculator. Here, you'll need to enter some of the other information we took down from GSpot, such as the duration, the audio bitrate, FPS and also the file size you want to achieve (either match the original file's file size). Once you enter all of the information, the bitrate you need is calculated for you and the bitrate is automatically adjusted for you as well when you press "OK". One thing to note here is that to ensure maximum compatibility, try to make sure the bitrate isn't too high, as you may risk problems with skipping. The range of acceptable bitrate will vary from player to player (so check your player's manuals for more information). For my DVD player, it is below 1500 kbit/s for files burned on CDs and 3000 kbit/s for files burned onto DVDs. Purple - 5. Then click on this button (purple) (Screen Shot Below) 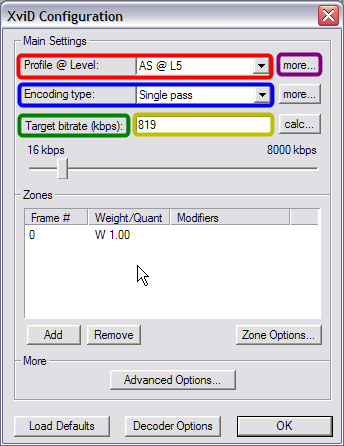 After clicking the "More" button the "XviD Configuration" screen will pop up. "Quarter Pixel" and "Global Motion Compensation" boxes must be unchecked! Do not put a check mark in those boxes! (red)! For maximum compatibility, uncheck the "B-VOPs" altogether, otherwise put a 1 in the "Max consecutive BVOP's:" (blue). Some experiment may be needed, as some players will not playback files with 2 B-VOPs, but other will if you deselect the "packed bitstream" option. If you have to use B-VOPs (which improves quality, but we're doing 1 pass encoding so quality has been sacrificed already), either disable the "packed bitstream" option, or leave "Max consecutive BVOP's:" at 1. (Screen Shot Below) 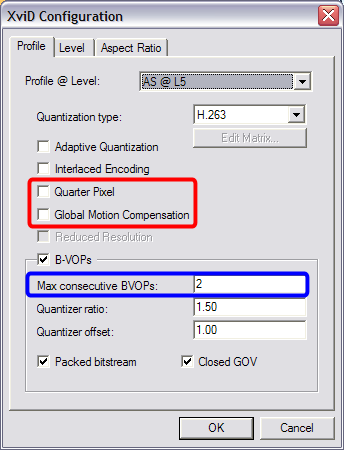 After setting the above settings, now click the "Aspect Ratio" tab (red). Make sure it says "Square (default)" in the shape of pixel box (blue). It should be selected by default, but non square pixels are good for encoding widescreen (eg. anamorphic) content, but many DVD players won't support this. (Screen Shot Below) 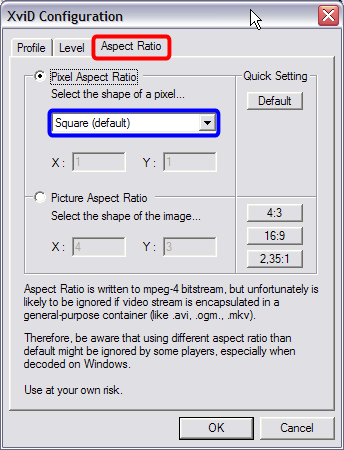 Press "OK" to close down the "Profile @ Level" setup screen and return to the main XviD setup screen. There is an "Advanced Options" button there that you can click on to setup further options for XviD (like Motions search precision, VHQ mode). Most of these settings are already explained in this guide, so you should go there and take a look. One interesting option is in the "Debug" section, where you can specify the output AVI's FourCC code, and change it to "DX50" for better compatibility (see the "Reasons for Incompatibility" section above). You're done! Just keep clicking the "OK" button until you return to the main VirtualDub screen. Now these settings for XviD and DivX are already set, so the next time you want to re-encode a video, you will just have to set the bitrate and thats it. After completing either the XviD method or the DivX method, lets start saving the avi in VirtualDub.
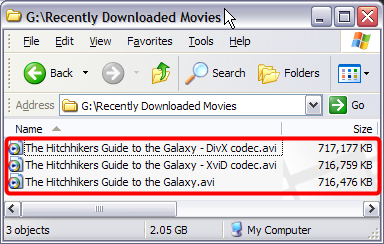
On your VirtualDub screen, click "File", then click "Save as AVI...". You cannot use the same name unless you are saving it to a different folder/directory than the orgininal avi file cause VirtualDub needs to use that file to re-encode. (Screen Shot Below) 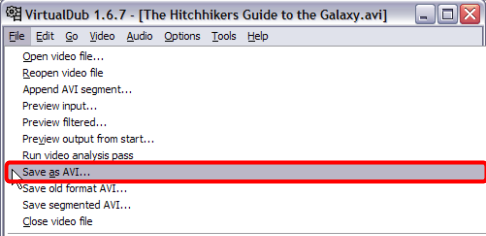 After clicking the "Save" button, VirtualDub will now start to re-encode the video file with the codec you chose earlier. (Screen Shot Below)  Your newly created avi file should be almost the same size as the original. (Screen Shot Below)
 Enjoy! |